안녕하세요?
일단 저는 다원 WIFI 플러그를 일정량 가지고 있는데, 이미 몇번 서버 먹통에 당한지라.. 아래의 방법을 이용하여 로컬화 하여 잘 사용중이였습니다.
https://blog.djjproject.com/668
(stkang90 님의 로컬화 방법)
이번에 새로 구매한 제품들이 펌업이 되어 오는 제품들이 있어 연동이 되지 않는 문제가 있어 카페에 공개된 채성식님 자료를 통해 리눅스 서버에 컨테이너로 설치해보겠습니다.
기본적으로 가이드는 자세하게 작성되어 있으나, 제가 나중에 참고할 용도로 하나 글을 작성해봅니다.
1. 공식 배포 주소
공식 배포 주소는 아래와 같습니다.
문서 : https://github.com/SeongSikChae/PowerManagerDocument
서버 : https://github.com/SeongSikChae/PowerManagerServer
API서버 : https://github.com/SeongSikChae/PowerManagerApiServer
인증서 생성 관련 파일 : https://github.com/SeongSikChae/Certificate
플러그 등록 프로그램 : https://github.com/SeongSikChae/PowerManagerConfig
프로그램을 작성해주신 채성식님께 무한의 감사의 말씀 드립니다.
2. 우분투 컨테이너 생성하기
일단은 내부망에서만 사용할 예정이고 컨테이너화 할 생각입니다.
그리고 기존에 돌아가는 서비스도 있어서 포트 겹침 문제로 macvlan 을 사용하여 컨테이너를 생성할 예정입니다.
일단 docker 에서 macvlan 네트워크를 하나 생성합니다.
저는 macvlan 대상 네트워크가 vmbr0 입니다. proxmox 를 사용중이라면 네트워크가 이렇게 이름이 바뀝니다.
물론 proxmox 의 lxc 기능을 통해 구현할 수 있지만, 조금 범용적으로 docker 를 통해 구성해보겠습니다.
| root@debian:~# ifconfig vmbr0: flags=4163<UP,BROADCAST,RUNNING,MULTICAST> mtu 1500 inet 192.168.0.17 netmask 255.255.255.0 broadcast 192.168.0.255 inet6 fe80::1e69:7aff:fe09:6d01 prefixlen 64 scopeid 0x20<link> ether 1c:69:7a:09:6d:01 txqueuelen 1000 (Ethernet) RX packets 2422201345 bytes 2365933084257 (2.1 TiB) RX errors 0 dropped 8 overruns 0 frame 0 TX packets 1385288012 bytes 2236546782661 (2.0 TiB) TX errors 0 dropped 0 overruns 0 carrier 0 collisions 0 |
docker 네트워크는 아래와 같이 생성합니다.
현재 서브넷이 192.168.0.0/24 이고 게이트웨이는 192.168.0.1 그리고 부모는 vmbr0 를 명시하면서 macvlan 이라는 이름을 가진 네트워크를 생성하는 것입니다.
| root@debian:~# docker network create -d macvlan --subnet=192.168.0.0/24 --gateway=192.168.0.1 -o parent=vmbr0 macvlan bind9 |
다음으로 아래의 명령을 통해 우분투 컨테이너를 하나 생성합니다.
백그라운드로 구동하고 제가 스탑시키지 않으면 자동실행되며
높은 권한으로 구동되고
네트워크는 macvlan 을 사용하며
ip는 DHCP 가 할당하는 범위에서 할당이 되지 않을것 같은? IP를 하나 할당합니다.
이름은 dawon-server 라고 생성하고 ubuntu 18.04 이미지에 entrypoint 는 /bin/bash 입니다.
| root@debian:~# docker run -dit --restart unless-stopped --privileged --net macvlan --ip=192.168.0.102 --name dawon-server ubuntu:18.04 /bin/bash |
해당 컨테이너로 들어가서 먼저 필요한 패키지들을 조금 설치해줍니다.
| root@debian:~# docker exec -it dawon-server /bin/bash root@7c00a5d21677:/# |
패키지 리스트를 먼저 갱신합니다.
| root@7c00a5d21677:/# apt update |
의존하는 패키지들을 설치합니다.
| root@7c00a5d21677:/# apt install sudo curl git wget vim dialog ca-certificates libicu60 locales tzdata openssl unzip dos2unix net-tools dnsutils bind9 |
기본적으로 로케일이나 타임존이 설정되어야 함으로 아래와 같이 설정을 진행합니다.


3. 서버 프로그램 받아 파일 배치
기본적으로 아래의 폴더 구성이 됩니다.
/PowerManager
/PowerManager/Certificate
/PowerManagerApi
1번 섹션에서 릴리즈를 받아 아래와 같이 배치합니다.
일단 운영체제 별로 아키텍쳐별로 파일이 있음으로 맞는 아키텍쳐를 골라 다운을 받습니다.
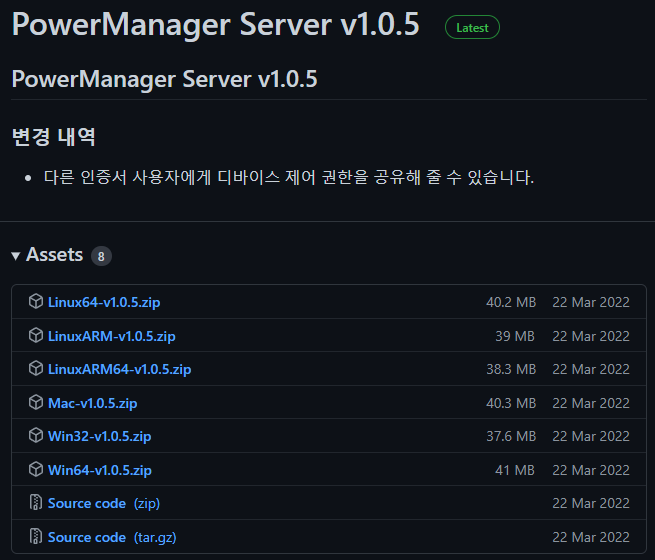
| root@7c00a5d21677:/# cd ~ root@7c00a5d21677:~# wget https://github.com/SeongSikChae/PowerManagerServer/releases/download/v1.0.5/Linux64-v1.0.5.zip -O PowerManagerServer.zip root@7c00a5d21677:~# wget https://github.com/SeongSikChae/PowerManagerApiServer/releases/download/v1.0.2/Linux64-v1.0.2.zip -O PowerManagerApiServer.zip root@7c00a5d21677:~# wget https://github.com/SeongSikChae/Certificate/releases/download/v1.0.0/Certificate.zip -O PowerManagerCertificate.zip |
그리고 파일을 적절하게 배치합니다.
| root@7c00a5d21677:~# mkdir -p /PowerManager/Certificate root@7c00a5d21677:~# mkdir -p /PowerManagerApi |
| root@7c00a5d21677:~# unzip PowerManagerServer.zip -d /PowerManager/ root@7c00a5d21677:~# unzip PowerManagerCertificate.zip -d /PowerManager/Certificate/ root@7c00a5d21677:~# unzip PowerManagerApiServer.zip -d /PowerManagerApi/ |
4. 인증서 생성하기
인증서에 대한 개념이 잘 없어서 이 부분은 아래와 같이 정확하게 따라하라고 밖에 말씀을 못드리겠네요.
일단은 스크립트를 생성하기위해 아래 파일을 조금 수정합니다.
| root@7c00a5d21677:~# cd /PowerManager/Certificate/ root@7c00a5d21677:/PowerManager/Certificate# ls Client.cfg certs crlnumber newcerts serial Server.cfg crl index.txt private ''$'\300\316\301\365\274\255\271\337\261\336''.txt' |
| root@7c00a5d21677:/PowerManager/Certificate# mv ''$'\300\316\301\365\274\255\271\337\261\336''.txt' genkey.sh |
이런 내용들이 들어 있습니다.
| root@7c00a5d21677:/PowerManager/Certificate# cat genkey.sh [루트인증서] openssl genrsa -out D:\PowerManager\Certificate\private\ca.key openssl req -new -key D:\PowerManager\Certificate\private\ca.key -out D:\PowerManager\Certificate\certs\ca.csr -config D:\PowerManager\Certificate\Server.cfg openssl x509 -req -days 3650 -extensions v3_ca -in D:\PowerManager\Certificate\certs\ca.csr -signkey D:\PowerManager\Certificate\private\ca.key -out D:\PowerManager\Certificate\newcerts\ca.crt -extfile D:\PowerManager\Certificate\Server.cfg openssl pkcs12 -inkey D:\PowerManager\Certificate\private\ca.key -in D:\PowerManager\Certificate\newcerts\ca.crt -export -out D:\PowerManager\Certificate\newcerts\ca.p12 [서버인증서] openssl genrsa -out D:\PowerManager\Certificate\private\S.key openssl req -new -key D:\PowerManager\Certificate\private\S.key -out D:\PowerManager\Certificate\certs\S.csr -config D:\PowerManager\Certificate\Server.cfg openssl x509 -req -days 3650 -extensions v3_req -in D:\PowerManager\Certificate\certs\S.csr -CA D:\PowerManager\Certificate\newcerts\ca.crt -CAcreateserial -CAkey D:\PowerManager\Certificate\private\ca.key -out D:\PowerManager\Certificate\newcerts\S.crt -extfile D:\PowerManager\Certificate\Server.cfg openssl pkcs12 -inkey D:\PowerManager\Certificate\private\S.key -in D:\PowerManager\Certificate\newcerts\S.crt -export -out D:\PowerManager\Certificate\newcerts\S.p12 [클라이언트인증서] openssl genrsa -out D:\PowerManager\Certificate\private\C.key openssl req -new -key D:\PowerManager\Certificate\private\C.key -out D:\PowerManager\Certificate\certs\C.csr -config D:\PowerManager\Certificate\Client.cfg openssl x509 -req -days 365 -extensions v3_user_req -in D:\PowerManager\Certificate\certs\C.csr -CA D:\PowerManager\Certificate\newcerts\ca.crt -CAcreateserial -CAkey D:\PowerManager\Certificate\private\ca.key -out D:\PowerManager\Certificate\newcerts\C.crt -extfile D:\PowerManager\Certificate\Client.cfg openssl pkcs12 -inkey D:\PowerManager\Certificate\private\C.key -in D:\PowerManager\Certificate\newcerts\C.crt -export -out D:\PowerManager\Certificate\newcerts\C.p12 |
조금 내용을 수정합니다.
먼저 윈도우 형태의 줄바꿈을 유닉스 형태로 바꿉니다.
| root@7c00a5d21677:/PowerManager/Certificate# dos2unix genkey.sh dos2unix: converting file genkey.sh to Unix format... |
이는 D:\~~ 경로를 수정하고 \를 /로 바꾸는 작업입니다.
| root@7c00a5d21677:/PowerManager/Certificate# sed -i -e 's,D:\\PowerManager\\Certificate\\,,g' genkey.sh root@7c00a5d21677:/PowerManager/Certificate# sed -i -e 's,\\,/,g' genkey.sh |
내용을 읽어보면 아래와 같이 바뀝니다.
여기서 루트 인증서와 서버인증서 등 메모를 echo 로 바꿔줍니다.
| root@7c00a5d21677:/PowerManager/Certificate# cat genkey.sh [루트인증서] openssl genrsa -out private/ca.key openssl req -new -key private/ca.key -out certs/ca.csr -config Server.cfg openssl x509 -req -days 3650 -extensions v3_ca -in certs/ca.csr -signkey private/ca.key -out newcerts/ca.crt -extfile Server.cfg openssl pkcs12 -inkey private/ca.key -in newcerts/ca.crt -export -out newcerts/ca.p12 [서버인증서] openssl genrsa -out private/S.key openssl req -new -key private/S.key -out certs/S.csr -config Server.cfg openssl x509 -req -days 3650 -extensions v3_req -in certs/S.csr -CA newcerts/ca.crt -CAcreateserial -CAkey private/ca.key -out newcerts/S.crt -extfile Server.cfg openssl pkcs12 -inkey private/S.key -in newcerts/S.crt -export -out newcerts/S.p12 [클라이언트인증서] openssl genrsa -out private/C.key openssl req -new -key private/C.key -out certs/C.csr -config Client.cfg openssl x509 -req -days 365 -extensions v3_user_req -in certs/C.csr -CA newcerts/ca.crt -CAcreateserial -CAkey private/ca.key -out newcerts/C.crt -extfile Client.cfg openssl pkcs12 -inkey private/C.key -in newcerts/C.crt -export -out newcerts/C.p12 |
여기서 루트 인증서와 서버인증서 등 메모를 echo 로 바꿔줍니다.
| root@7c00a5d21677:/PowerManager/Certificate# vi genkey.sh echo "[rootca]" openssl genrsa -out private/ca.key openssl req -new -key private/ca.key -out certs/ca.csr -config Server.cfg openssl x509 -req -days 3650 -extensions v3_ca -in certs/ca.csr -signkey private/ca.key -out newcerts/ca.crt -extfile Server.cfg openssl pkcs12 -inkey private/ca.key -in newcerts/ca.crt -export -out newcerts/ca.p12 echo "[server]" openssl genrsa -out private/S.key openssl req -new -key private/S.key -out certs/S.csr -config Server.cfg openssl x509 -req -days 3650 -extensions v3_req -in certs/S.csr -CA newcerts/ca.crt -CAcreateserial -CAkey private/ca.key -out newcerts/S.crt -extfile Server.cfg openssl pkcs12 -inkey private/S.key -in newcerts/S.crt -export -out newcerts/S.p12 echo "[client]" openssl genrsa -out private/C.key openssl req -new -key private/C.key -out certs/C.csr -config Client.cfg openssl x509 -req -days 365 -extensions v3_user_req -in certs/C.csr -CA newcerts/ca.crt -CAcreateserial -CAkey private/ca.key -out newcerts/C.crt -extfile Client.cfg openssl pkcs12 -inkey private/C.key -in newcerts/C.crt -export -out newcerts/C.p12 |
그리고 Server.cfg 파일과 Client.cfg 파일을 수정합니다.
12번째줄의 HOME 경로를 실제 경로로 맞춰줍니다.
13번째줄은 에러가 발생하여 코멘트 처리합니다.
| root@7c00a5d21677:/PowerManager/Certificate# vi Server.cfg 10 # This definition stops the following lines choking if HOME isn't 11 # defined. 12 HOME = PowerManager/Certificate 13 #RANDFILE = $ENV::HOME/.rnd 14 15 # Extra OBJECT IDENTIFIER info: 16 #oid_file = $ENV::HOME/.oid 17 oid_section = new_oids # Server.cfg 의 경우 아래의 줄 번호에 서버 IP를 적습니다. 저는 192.168.0.102 로 할당했으니 그걸 적었습니다. 263 [ alt_names ] 264 #DNS.1 = 265 #DNS.2 = 266 #DNS.3 = 267 IP.1 = 192.168.0.102 268 #IP.2 = 269 #IP.3 = root@7c00a5d21677:/PowerManager/Certificate# vi Client.cfg 10 # This definition stops the following lines choking if HOME isn't 11 # defined. 12 HOME = /PowerManager/Certificate 13 #RANDFILE = $ENV::HOME/.rnd 14 15 # Extra OBJECT IDENTIFIER info: 16 #oid_file = $ENV::HOME/.oid 17 oid_section = new_oids |
인증서를 생성해 봅니다.
아래에 비어있는 것은 엔터로 넘긴것입니다.
비밀번호를 입력해야하는 칸은 찐하게 처리해 두었습니다.
각개 인증서에 비밀번호를 입력해야하는데 되도록이면 3개다 같으면 헷깔리지 않습니다.
| root@7c00a5d21677:/PowerManager/Certificate# bash genkey.sh # 루트인증서를 생성합니다. [rootca] Generating RSA private key, 2048 bit long modulus (2 primes) ............................................................................................................................................................+++++ ...................................................+++++ e is 65537 (0x010001) You are about to be asked to enter information that will be incorporated into your certificate request. What you are about to enter is what is called a Distinguished Name or a DN. There are quite a few fields but you can leave some blank For some fields there will be a default value, If you enter '.', the field will be left blank. ----- Country Name (2 letter code) [KR]: State or Province Name (full name) []: Locality Name (eg, city) []: Organization Name (eg, company) []: Organizational Unit Name (eg, section) []: # 여기에 아무거나 입력합니다. 저는 powermanager 라고 입력했습니다. Common Name (e.g. server FQDN or YOUR name) []:powermanager Email Address []: Please enter the following 'extra' attributes to be sent with your certificate request # 여기는 엔터로 넘어가면 됩니다. A challenge password []: An optional company name []: Signature ok subject=C = KR, CN = powermanager Getting Private key # 여기는 인증서에 사용할 비밀번호를 입력합니다. Enter Export Password: Verifying - Enter Export Password: # 서버인증서 생성 [server] Generating RSA private key, 2048 bit long modulus (2 primes) ..+++++ ................................................................+++++ e is 65537 (0x010001) You are about to be asked to enter information that will be incorporated into your certificate request. What you are about to enter is what is called a Distinguished Name or a DN. There are quite a few fields but you can leave some blank For some fields there will be a default value, If you enter '.', the field will be left blank. ----- Country Name (2 letter code) [KR]: State or Province Name (full name) []: Locality Name (eg, city) []: Organization Name (eg, company) []: Organizational Unit Name (eg, section) []: # Common Name 에 서버 IP 주소를 넣습니다. Common Name (e.g. server FQDN or YOUR name) []:192.168.0.102 Email Address []: Please enter the following 'extra' attributes to be sent with your certificate request A challenge password []: An optional company name []: Signature ok subject=C = KR, CN = 192.168.0.102 Getting CA Private Key # 인증서에 사용할 비밀번호를 입력합니다. Enter Export Password: Verifying - Enter Export Password: # 클라이언트 인증서 생성 [client] Generating RSA private key, 2048 bit long modulus (2 primes) .............................................+++++ ................................+++++ e is 65537 (0x010001) You are about to be asked to enter information that will be incorporated into your certificate request. What you are about to enter is what is called a Distinguished Name or a DN. There are quite a few fields but you can leave some blank For some fields there will be a default value, If you enter '.', the field will be left blank. ----- Country Name (2 letter code) [KR]: State or Province Name (full name) []: Locality Name (eg, city) []: Organization Name (eg, company) []: Organizational Unit Name (eg, section) []: # Common Name 에 아무거나 입력합니다. 저는 powermanager 라고 입력했습니다. Common Name (e.g. server FQDN or YOUR name) []:powermanager Email Address []: Please enter the following 'extra' attributes to be sent with your certificate request A challenge password []: An optional company name []: Signature ok subject=C = KR, CN = powermanager Getting CA Private Key # 인증서에 사용할 비밀번호를 기입합니다. Enter Export Password: Verifying - Enter Export Password: |
다음으로 루트 인증서를 서버에 등록합니다.
| root@7c00a5d21677:/PowerManager/Certificate/newcerts# cp ca.crt /usr/local/share/ca-certificates/ root@7c00a5d21677:/PowerManager/Certificate/newcerts# update-ca-certificates Updating certificates in /etc/ssl/certs... 1 added, 0 removed; done. Running hooks in /etc/ca-certificates/update.d... done. |
5. 인증서 파일 배치 및 서버 설정
생성된 인증서 파일을 보면 아래와 같습니다.
| root@7c00a5d21677:/PowerManager/Certificate# cd newcerts/ root@7c00a5d21677:/PowerManager/Certificate/newcerts# ls C.crt C.p12 S.crt S.p12 ca.crt ca.p12 ca.srl |
아래와 같이 파일을 배치합니다.
| root@7c00a5d21677:/PowerManager/Certificate/newcerts# cp S.p12 ../../config/S.p12 root@7c00a5d21677:/PowerManager/Certificate/newcerts# cp S.p12 ../../../PowerManagerApi/config/S.p12 |
그리고 클라이언트 인증서 파일에서 fingerprint 값을 찾습니다.
fingerprint 값을 : 없이 소문자로 뽑아야 하기 때문에 아래 명령어를 돌려서 찾습니다.
| root@7c00a5d21677:/PowerManager/Certificate/newcerts# openssl x509 -in "C.crt" -noout -fingerprint -sha1 | sed -e 's,:,,g' | sed -e 's,[A-Z],\L&,g' sha1 fingerprint=adfafafds12312312424354351312 |
PowerManager Server 의 config.yaml 파일을 아래와 같이 수정합니다.
| root@7c00a5d21677:/PowerManager/Certificate/newcerts# vi ../../config/config.yml HttpPort: 80 HttpsPort: 443 ServerCertificate: /PowerManager/config/S.p12 ServerCertificatePassword: 12345 MqttServerPort: 1803 DbPath: /PowerManager/data/PowerManager.sqlite AdminThumbprint: adfafafds12312312424354351312 |
다음으로 PowerManagerApi Server 의 config.yaml 파일을 아래와 같이 수정합니다.
| root@7c00a5d21677:/PowerManager/Certificate/newcerts# vi /PowerManagerApi/config/config.yml HttpPort: 18080 HttpsPort: 18443 ServerCertificate: /PowerManagerApi/config/S.p12 ServerCertificatePassword: 12345 DbPath: /PowerManagerApi/data/PowerManagerApi.sqlite |
6. 테스트 구동하기
서버를 아래와 같이 구동합니다.
첫번째로 PowerManager 서버를 구동합니다.
| # 먼저 실행 권한을 줍니다. root@7c00a5d21677:/PowerManager/Certificate/newcerts# cd /PowerManager root@7c00a5d21677:/PowerManager# chmod a+x PowerManagerServer *.sh root@7c00a5d21677:/PowerManager# ./run.sh & [1] 4146 root@7c00a5d21677:/PowerManager# starting PowerManagerServer |
다음으로 PowerManagerApi 서버를 구동합니다.
| root@7c00a5d21677:/PowerManager# cd /PowerManagerApi/ root@7c00a5d21677:/PowerManagerApi# chmod a+x PowerManagerApiServer *.sh root@7c00a5d21677:/PowerManagerApi# ./run.sh & [2] 4182 root@7c00a5d21677:/PowerManagerApi# starting PowerManagerApiServer |
포트가 열려있는지 확인합니다.
| root@7c00a5d21677:/PowerManagerApi# netstat -nlp Active Internet connections (only servers) Proto Recv-Q Send-Q Local Address Foreign Address State PID/Program name tcp 0 0 0.0.0.0:18080 0.0.0.0:* LISTEN 4188/PowerManagerAp tcp 0 0 127.0.0.11:41221 0.0.0.0:* LISTEN - tcp 0 0 0.0.0.0:18443 0.0.0.0:* LISTEN 4188/PowerManagerAp tcp 0 0 0.0.0.0:1803 0.0.0.0:* LISTEN 4152/PowerManagerSe tcp 0 0 0.0.0.0:80 0.0.0.0:* LISTEN 4152/PowerManagerSe tcp 0 0 0.0.0.0:8883 0.0.0.0:* LISTEN 4152/PowerManagerSe tcp 0 0 0.0.0.0:443 0.0.0.0:* LISTEN 4152/PowerManagerSe tcp6 0 0 :::1803 :::* LISTEN 4152/PowerManagerSe tcp6 0 0 :::8883 :::* LISTEN 4152/PowerManagerSe udp 0 0 127.0.0.11:44253 0.0.0.0:* - Active UNIX domain sockets (only servers) Proto RefCnt Flags Type State I-Node PID/Program name Path unix 2 [ ACC ] STREAM LISTENING 125726258 4152/PowerManagerSe /tmp/dotnet-diagnostic-4152-239067238-socket unix 2 [ ACC ] STREAM LISTENING 125730302 4188/PowerManagerAp /tmp/dotnet-diagnostic-4188-239073782-socket |
7. 윈도우에 인증서 등록
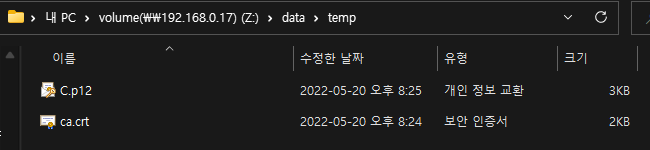
호스트 쉘에서 인증서 파일을 윈도우로 복사합니다.
| root@debian:/media/data/temp# docker cp dawon-server:/PowerManager/Certificate/newcerts/C.p12 . root@debian:/media/data/temp# docker cp dawon-server:/PowerManager/Certificate/newcerts/ca.crt . |
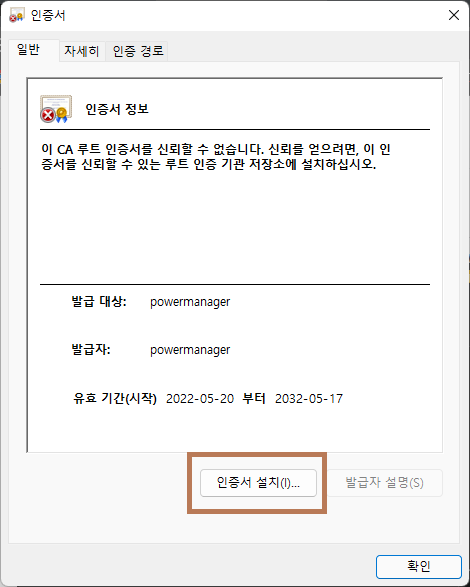
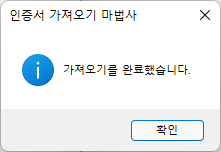
인증서를 윈도우에서 아래와 같이 등록합니다.
먼저 루트 인증서를 더블클릭해서 등록합니다.

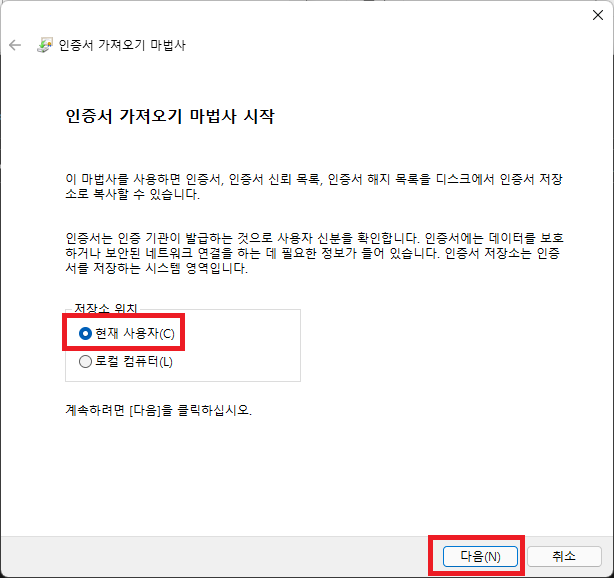
로컬 컴퓨터를 선택하고 다음을 누릅니다.

모든 인증서를 다음 저장소에 저장을 체크하고 찾아보기를 누릅니다.

신뢰할 수 있는 루트 인증기관을 선택합니다.

다음을 누릅니다.


다음으로 클라이언트 인증서를 더블클릭하여 열어서 등록합니다.

현재 사용자를 선택하고 다음을 누릅니다.
다음을 누릅니다.
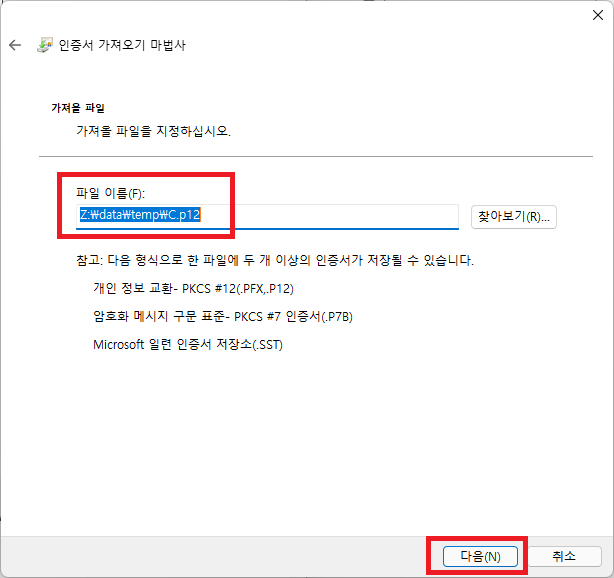
4번 섹션에서 클라이언트 인증서를 생성할 때 입력했던 비밀번호를 넣고 다음을 누릅니다.

모든 인증서를 다음 저장소에 저장을 체크하고 찾아보기를 누릅니다.

개인용을 선택합니다.

다음을 누릅니다.


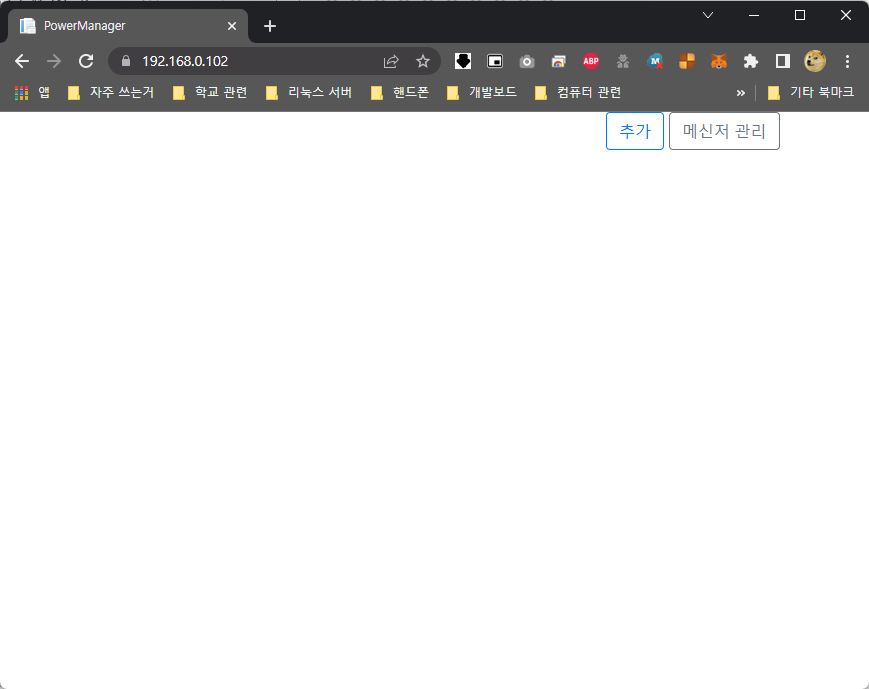
8. 웹페이지가 열리는지 체크
서버IP:80 으로 접근하여 웹 페이지가 열리는지 체크합니다.
주소를 입력하는 순간 443으로 이동되며, 인증서 선택창이 뜹니다.

이렇게 페이지가 열리면 일단 정상 동작하는 것입니다.
9. 네임서버 운영하기
*.dawonai.com 이 사설 서버에 연결을 하도록 fake 해야하는 부분이 있어서 dns 서버를 구동하여 *.dawonai.com 을 설치한 192.168.0.102 를 가리키게 해야합니다.
아래과 같이 설정을 진행합니다.
의존 패키지 설치에서 설치를 이미 했지만 혹시 안하셨으면 설치해야합니다.
| root@7c00a5d21677:/PowerManager/Certificate/newcerts# apt install bind9 |
설정 폴더로 이동하여 일단 기초 설정을 진행합니다.
따로 기본 설정은 건들일 필요 없고, zone 설정만 하면 됩니다.
zone 설정은 named.conf.local 파일을 수정합니다.
| root@7c00a5d21677:/etc/bind# vi named.conf.local // // Do any local configuration here // // Consider adding the 1918 zones here, if they are not used in your // organization //include "/etc/bind/zones.rfc1918"; zone "dawonai.com" IN { type master; file "/etc/bind/db.dawonai.com"; allow-update { none; }; allow-transfer { none; }; }; zone "59.194.20.in-addr.arpa" IN { type master; file "/etc/bind/db.59.194.20"; allow-update { none; }; allow-transfer { none; }; }; |
각 존에 대해 설정파일을 아래와 같이 생성합니다.
| root@7c00a5d21677:/etc/bind# vi db.dawonai.com $TTL 86400 @ IN SOA dawonai.com. root ( 1 ; Serial 604800 ; Refresh 86400 ; Retry 2419200 ; Expire 86400 ) ; Negative Cache TTL ; @ IN NS dawonai.com. @ IN A 192.168.0.102 dwmqtt IN A 192.168.0.102 dwapi IN A 192.168.0.102 root@7c00a5d21677:/etc/bind# vi db.59.194.20 $TTL 86400 @ IN SOA dawonai.com. root ( 1 ; Serial 604800 ; Refresh 86400 ; Retry 2419200 ; Expire 86400 ) ; Negative Cache TTL ; @ IN NS dawonai.com @ IN A 192.168.0.102 102 IN PTR dawonai.com. 102 IN PTR dwmqtt.dawonai.com 102 IN PTR dwapi.dawonai.com |
위의 102 필드는 IP 주소 끝자리입니다.
설정이 끝났으면 bind9 서비스를 시작합니다.
| root@7c00a5d21677:/etc/bind# /etc/init.d/bind9 start * Starting domain name service... bind9 [ OK ] |
nslookup 을 통해 다원 서버가 제 서버 주소를 가리키는지 확인합니다.
| root@7c00a5d21677:/etc/bind# nslookup dawonai.com 192.168.0.102 Server: 192.168.0.102 Address: 192.168.0.102#53 Name: dawonai.com Address: 192.168.0.102 root@7c00a5d21677:/etc/bind# nslookup dwmqtt.dawonai.com 192.168.0.102 Server: 192.168.0.102 Address: 192.168.0.102#53 Name: dwmqtt.dawonai.com Address: 192.168.0.102 root@7c00a5d21677:/etc/bind# nslookup dwapi.dawonai.com 192.168.0.102 Server: 192.168.0.102 Address: 192.168.0.102#53 Name: dwapi.dawonai.com Address: 192.168.0.102 |
10. 공유기 DNS 서버 설정 변경하기
실제로 하위 공유기를 하나 더 두어 플러그만 연결할 수 있도록 구성하는게 맞으나, 지금 상황이 여의치 않아 메인 공유기에 DNS를 설정했습니다.

DNS 설정이 recursive 를 disable 하지 않아 다른 도메인은 네임 리졸브가 가능한 상태입니다.
윈도우 컴퓨터에서 DNS 주소를 받아온것을 확인해보면 정상적으로 설정이 되었음을 알 수 있습니다.
이 설정이 컴퓨터에서는 필요하지는 않습니다. 확인차 설정해본 것입니다.

11. 플러그 연동하기
플러그를 연동해 보겠습니다. 펌업을 하려고 AIPM 앱에 한번 연결을 했어서 아래의 방법으로 연동해야합니다.
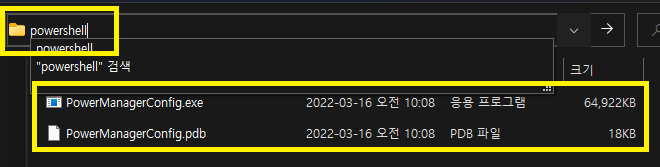
PowerManagerConfig 파일을 받고 압축을 푼 다음 주소창에 powershell 이라고 입력하여 powershell 을 실행합니다.
그리고 클라이언트 인증서 파일을 동일 위치에 배치합니다.

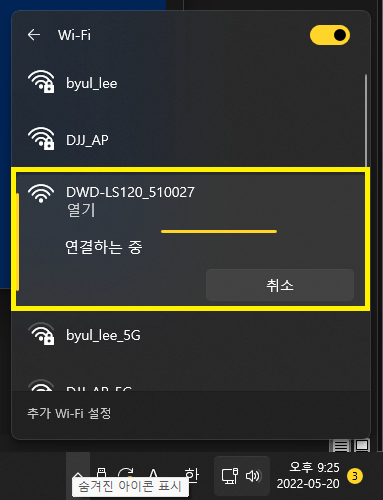
플러그를 초기화 하고 윈도우에서 와이파이 연결합니다.
'IoT' 카테고리의 다른 글
| 다원 와이파이 플러그 HA 연동의 콤필레이션 (CSS님 사설서버 + HA 브릿지) (406) | 2022.08.17 |
|---|---|
| Yeelight BT 모델 무드등을 쓰기위한 튜닝 완결판 (usb reset 및 구성요소 재 로딩) (448) | 2022.08.01 |
| mqtt 서버 끼리 연동하기 (외부/내부 따로 운영 + zigbee2mqt / External Bridge) (416) | 2022.02.16 |
| 유플러스 Zwave 스틱 + 다원 플러그 Zwave 연동 및 Zwavejs2Mqtt (458) | 2021.09.28 |
| 샤오미 BLE 온습도 센서 연동하기 (LYWSD03MMC) - HomeAssistant (389) | 2021.08.08 |


댓글