안녕하세요? 도정진입니다.
다원 플러그의 최신 펌부터 로컬 연동이 막히기 시작하면서 일단은 CSS님 서버를 이용해서 설치를 해보려고 아래의 시도를 했습니다.
다만, 그 때에도 설치과정이 매우 어려운데다 특히 인증서를 활용하는 과정은 너무 이해가 안되어서 설치를 하고 나서도 연동을 못하고 있었는데요.
전의 글은 아래의 글입니다.
https://blog.djjproject.com/798
이때, 알 수 없는 이유로 연동을 실패하여 여러번 재설치 과정을 거치고 밤도 새고 해보았는데 죽어도 안되더라구요.
윈도우에서 동일한 방법으로 구동하면 문제없이 작동하길래.. 할말을 잃어버려... 일단 다음에 이어서 해보기로 그냥 서랍에 고히 .. 내용을 모셔둔 상태였습니다.
일단은 CSS님께 문의를 드리려면 컨테이너화 해서, 그리고 설치글을 작성해서 여쭤봐야 해결이 될 것 같아 이렇게 docker 컨테이너 제작과 내용을 상세하게 작성합니다.
1. 구조
정확하게 알지는 못하지만 현재 최신버전의 다원 WIFI 플러그는 아래의 연동과정을 거쳐 연동이 됩니다.
다원의 API 서버 접근 후, mqtt 에 접속할 MQTT 비밀번호를 할당받게 되고, CSS님 께서도 이 비밀번호가 생성되는 방법을 인지하지 못하셔서, 실제 다원 서버에서 값을 받아와서 사설 서버에 저장하는 형태로 진행하고 계십니다.
사설 서버의 구조는 아래와 같습니다.

처음에 등록할 때, 설정용 PC 가 다원 플러그에 설정값을 넘겨줍니다.
이때 설정값은 AP 가 192.168.1.1 로 할당되어 있는 하위 공유기로 연결하게 되고, 하위 공유기는 Custom Dawon Server 가 설치된 192.168.0.200 의 DNS 값을 가지고 있습니다.
다원 플러그는 DNS 를 192.168.0.200 으로 받아들이며
192.168.0.200 에 설치된 bind9 는 dawonai.com / dwmqtt.dawonai.com / dwapi.dawonai.com 을 192.168.0.200 으로 변경한 DNS 레코드를 가지고 있습니다.
처음에 설정값을 넘겨주고, PC가 본래 사용하던 인터넷 연결을 활용하게 되면
실제 dwapi.dawonai.com 으로 플러그 정보를 전송하여 mqtt 비밀번호 값을 넘겨받게 됩니다.
이 mqtt 비밀번호 값을 192.168.0.200 (Dawon Custom Server) 에 등록하여 플러그와 연동하는 방법입니다.
즉, 요는 하위 공유기가 있거나 hostapd 를 통해 와이파이 존을 하나 운영해야 이 방법이 가능한 것입니다.
2. 컨테이너 작성 (Dockerfile)
아래와 같이 컨테이너를 작성하였으며, 필요한 설치 과정은 모두 포함되어 있는 상태입니다.
https://github.com/djjproject/dawon_css_server_docker
일단 작동하는 것이 목표라서 컨테이너의 레이어 관계등을 고려하지 않고 1개 레이어로 퉁쳐버린 좋지 않은 모습입니다만, 일단 추후에 유지보수를 통해서 레이어를 잘게 잘게 쪼개서 추후 업데이트때 용량 효율성을 도모하도록 하겠습니다.
코드는 아래와 같습니다.
먼저 Dockerfile 입니다.
| FROM ubuntu:18.04 MAINTAINER djjproject <djj9404@gmail.com> WORKDIR /app # ports EXPOSE 18080 18443 1803 80 8883 443 53 # locales ENV LANG=en_US.UTF-8 \ LANGUAGE=en_US:en \ LC_ALL=en_US.UTF-8 # copy files COPY . /app # run install script RUN bash /app/install.sh # run script CMD ["/bin/bash", "/app/init.sh"] |
각각 쪼개서 설명을 드리겠습니다.
| # 베이스로 하는 컨테이너 이름을 작성합니다. # 저는 ubuntu:18.04 를 기준으로 작성했습니다. FROM ubuntu:18.04 # 메인테이너 정보를 기입합니다. MAINTAINER djjproject <djj9404@gmail.com></djj9404@gmail.com> # WORKDIR 를 지정합니다. 컨테이너의 홈폴더 개념으로 보시면 됩니다. WORKDIR /app |
| # 말 그대로 포트입니다. macvlan 을 사용하지 않고 docker port forwarding 을 사용할 때 expose 할 포트들을 명기했습니다. # ports EXPOSE 18080 18443 1803 80 8883 443 53 |
| # 로케일 설정입니다. # locales ENV LANG=en_US.UTF-8 \ LANGUAGE=en_US:en \ LC_ALL=en_US.UTF-8 |
| # 현 폴더에 있는 파일을 컨테이너의 /app 폴더에 복사합니다. # copy files COPY . /app # /app 폴더의 install.sh 를 수행합니다. # run install script RUN bash /app/install.sh |
--> 이때 RUN 구문은 1개의 레이어로 작성되어 매번 빌드시 마다 해쉬값이 바뀌어 다른 레이어로 지정됩니다. 따라서 이때 용량 과다 발생 문제가 발생하여 차후에는 install.sh 에 있는 내용을 RUN으로 최대한 변경하여 다수의 레이어를 가지도록 할 예정입니다.
아래를 보시면 레이어 해쉬가 매번 다릅니다.
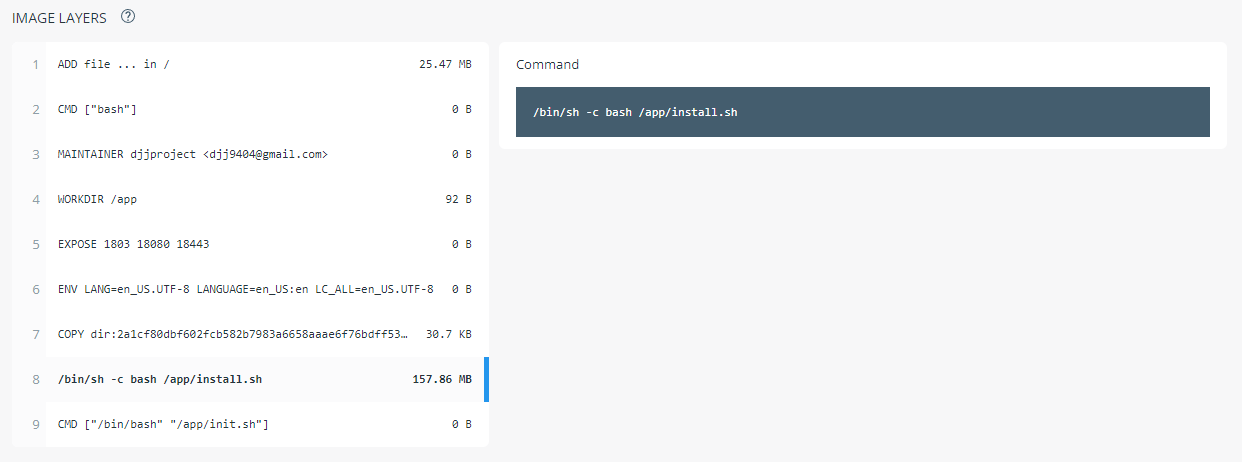
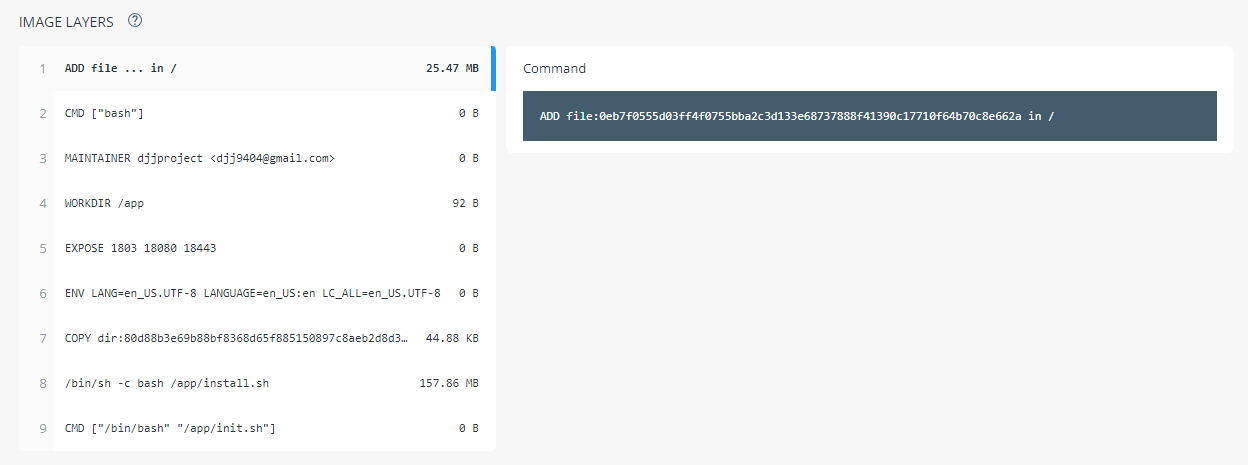
용량은 같게 나오지만, install.sh 내용이 조금이라도 변하면 157.86MB가 매번 빌드할때마다 늘어난다고 보시면 됩니다.
| # 기본적으로 실행할 스크립트를 작성합니다. # entrypoint 와 다른점은 docker run 시 명령을 지정하면 아래 CMD 는 무시됩니다. # entrypoint 는 CMD와 별개로 실행되는 것으로 고정을 하고 싶으면 ENTRYPOINT 로 작성해도 무방합니다. # run script CMD ["/bin/bash", "/app/init.sh"] |
3. 컨테이너 작성 (install.sh)
스크립트 전체는 아래와 같습니다.
| #!/bin/bash # 차후 컨테이너 설정이 바뀌는 것을 대비하여 아래와 같이 변수를 설정했습니다. TIMEZONE="Asia/Seoul" # 앱 실행파일들을 가져올 경로입니다. SERVER_URL="https://github.com/SeongSikChae/PowerManagerServerV2/releases/download/449885d5/Linux64-449885d5.zip" CERTI_URL="https://github.com/SeongSikChae/Certificate/releases/download/v1.0.0/Certificate.zip" # 디렉터리 값을 변수로 지정했습니다. ROOT=/app CERTI_DIR=$ROOT/certificate SERVER_DIR=$ROOT/server TEMP_DIR=$ROOT/temp DATA_DIR=$ROOT/data # 의존성 패키지 설치 부분입니다. # install dependencies apt update DEBIAN_FRONTEND=noninteractive apt install -y sudo curl git wget vim dialog ca-certificates libicu60 locales \ tzdata openssl unzip dos2unix net-tools dnsutils bind9 # 필요한 경로를 생성하는 부분입니다. # dir create mkdir -p $CERTI_DIR $SERVER_DIR $TEMP_DIR $DATA_DIR # 로케일을 기본 영어로 설정하는 부분입니다. # 한국어로 나오면 오히려 구글 검색이 힘들어서 로케일은 영어로 설정하는 편입니다. # 이때 non-interactive 가 중요하여 스크립트 기법이 들어가 있습니다. # locale sed -i -e 's/# en_US.UTF-8 UTF-8/en_US.UTF-8 UTF-8/' /etc/locale.gen dpkg-reconfigure --frontend=noninteractive locales update-locale LANG=en_US.UTF-8 # non-interactive 로 타임존을 설정하는 부분입니다. # timezone ln -sf /usr/share/zoneinfo/${TIMEZONE} /etc/localtime dpkg-reconfigure -f noninteractive tzdata # CSS님의 파워매니저 서버 파일을 다운받는 부분입니다. # get powermanager server / certificate wget ${SERVER_URL} -O $TEMP_DIR/server.zip wget ${CERTI_URL} -O $TEMP_DIR/certificate.zip # 압축을 지정한 경로에 풉니다. # install server / certificate unzip $TEMP_DIR/server.zip -d $SERVER_DIR unzip $TEMP_DIR/certificate.zip -d $CERTI_DIR # 인증서의 경우 윈도우 줄바꿈이 있어 dos2unix 로 변경을 합니다. # certificate cd $CERTI_DIR dos2unix Server.cfg dos2unix Client.cfg # 인증서가 있는 HOME 경로를 맞춰주고 # RANDOM 파일을 기본 default 로 주기 위해 코멘트 처리합니다. sed -i -e "s,HOME\t\t\t=.*,HOME\t\t\t= $CERTI_DIR,g" $CERTI_DIR/Server.cfg sed -i -e "s,HOME\t\t\t=.*,HOME\t\t\t= $CERTI_DIR,g" $CERTI_DIR/Client.cfg sed -i -e 's,RANDFILE\t\t=.*,#RANDFILE\t\t=,g' $CERTI_DIR/Server.cfg sed -i -e 's,RANDFILE\t\t=.*,#RANDFILE\t\t=,g' $CERTI_DIR/Client.cfg # DNS 설정값입니다. # DJJPROJECT_ 는 추후 config.sh 를 실행하면서 치환됩니다. # 정방향과 역방향에 대해서 설정하는 부분으로 첫번째는 정방향 # 두번째는 역방향입니다. # dns server configuration cat << 'EOF' > /etc/bind/named.conf.local zone "dawonai.com" IN { type master; file "/etc/bind/db.dawonai.com"; allow-update { none; }; allow-transfer { none; }; }; zone "DJJPROJECT_CONF_3_ADDR.in-addr.arpa" IN { type master; file "/etc/bind/db.DJJPROJECT_CONF_3_ADDR"; allow-update { none; }; allow-transfer { none; }; }; EOF cat << 'EOF' > /etc/bind/db.dawonai.com $TTL 86400 @ IN SOA dawonai.com. root ( 1 ; Serial 604800 ; Refresh 86400 ; Retry 2419200 ; Expire 86400 ) ; Negative Cache TTL ; @ IN NS dawonai.com. @ IN A DJJPROJECT_CONF_SERVER_IP dwmqtt IN A DJJPROJECT_CONF_SERVER_IP dwapi IN A DJJPROJECT_CONF_SERVER_IP EOF # 기본 설정파일을 yml.example 로 변경합니다. # 그리고 PowerMangerServer 파일에 실행권한을 줍니다. # server config.yml mv $SERVER_DIR/config/config.yml $SERVER_DIR/config/config.yml.example chmod a+x $SERVER_DIR/PowerManagerServer # 그리고 openssl 의 seclevel 이 2로 되어 있어서 플러그 연동이 안되는 문제를 해결하는 openssl.cnf 파일을 복사합니다. # openssl seclevel cp $ROOT/openssl.cnf /etc/ssl/openssl.cnf # cleanup apt clean rm -rf /app/temp |
너무 길어서 스크립트에 설명을 추가하였습니다.
원본은 아래에서 참고를 하시면 됩니다.
https://github.com/djjproject/dawon_css_server_docker/blob/master/install.sh
4. 컨테이너 작성 (config.sh)
컨테이너를 생성하고 설정을 하는 스크립트 입니다.
원본은 아래와 같습니다.
https://github.com/djjproject/dawon_css_server_docker/blob/master/config.sh
설명은 아래와 같습니다.
| #!/bin/bash ROOT=/app DATA_DIR=$ROOT/data CERTI_DIR=$ROOT/certificate SERVER_DIR=$ROOT/server function output() { echo -e "\e[0;33m[config] $1\e[0m" } # 서버 아이피를 입력받습니다. output "server ip" read -p "enter server ip: " SERVER_IP output "SERVER_IP: $SERVER_IP" # 인증서를 새로 생성할지 묻는 부부분입니다. output "certificate" read -p "certificate create? [y/n] " INPUT # 인증서를 새로 생성하기로 했다면 아래 if 문에 걸립니다. if [ "x$INPUT" = "xy" ]; then # 인증서 패스워드를 입력 받습니다. output "certificate password" read -p "certificate password: " CERTI_PASSWORD # Server.cfg 에 CA 가 사용될 IP 주소를 설정합니다. sed -i -e "s,IP.1 = 10.0.0.4,IP.1 = $SERVER_IP,g" $CERTI_DIR/Server.cfg # 루트 인증서를 생성합니다. output "generate root certificate ..." openssl genrsa -out $CERTI_DIR/private/ca.key echo -e "\n\n\n\nPowerManager\n\n\n\n" | openssl req -new -key $CERTI_DIR/private/ca.key -out $CERTI_DIR/certs/ca.csr -config $CERTI_DIR/Server.cfg openssl x509 -req -days 3650 -extensions v3_ca -in $CERTI_DIR/certs/ca.csr -signkey $CERTI_DIR/private/ca.key -out $CERTI_DIR/newcerts/ca.crt -extfile $CERTI_DIR/Server.cfg openssl pkcs12 -inkey $CERTI_DIR/private/ca.key -in $CERTI_DIR/newcerts/ca.crt -export -out $CERTI_DIR/newcerts/ca.p12 -passout pass:$CERTI_PASSWORD # 서버 인증서를 생성합니다. output "generate server certificate ..." openssl genrsa -out $CERTI_DIR/private/S.key echo -e "\n\n\n\n$SERVER_IP\n\n\n\n" | openssl req -new -key $CERTI_DIR/private/S.key -out $CERTI_DIR/certs/S.csr -config $CERTI_DIR/Server.cfg openssl x509 -req -days 3650 -extensions v3_req -in $CERTI_DIR/certs/S.csr -CA $CERTI_DIR/newcerts/ca.crt -CAcreateserial -CAkey $CERTI_DIR/private/ca.key -out $CERTI_DIR/newcerts/S.crt -extfile $CERTI_DIR/Server.cfg openssl pkcs12 -inkey $CERTI_DIR/private/S.key -in $CERTI_DIR/newcerts/S.crt -export -out $CERTI_DIR/newcerts/S.p12 -passout pass:$CERTI_PASSWORD # 클라이언트 인증서를 생성합니다. output "generate client certificate ..." openssl genrsa -out $CERTI_DIR/private/C.key echo -e "\n\n\n\n\nPowerManager\n\n\n\n" | openssl req -new -key $CERTI_DIR/private/C.key -out $CERTI_DIR/certs/C.csr -config $CERTI_DIR/Client.cfg openssl x509 -req -days 365 -extensions v3_user_req -in $CERTI_DIR/certs/C.csr -CA $CERTI_DIR/newcerts/ca.crt -CAcreateserial -CAkey $CERTI_DIR/private/ca.key -out $CERTI_DIR/newcerts/C.crt -extfile $CERTI_DIR/Client.cfg openssl pkcs12 -inkey $CERTI_DIR/private/C.key -in $CERTI_DIR/newcerts/C.crt -export -out $CERTI_DIR/newcerts/C.p12 -passout pass:$CERTI_PASSWORD # 생성된 인증서를 /app/data/newcerts 로 복사합니다. output "copy generated certificate files ..." cp -ar -v $CERTI_DIR/newcerts $DATA_DIR/ fi # 생성 되었거나 이미 있는 루트 인증서를 서버에 등록합니다. output "register root certificate ..." rm /usr/local/share/ca-certificates/ca.crt update-ca-certificates cp $DATA_DIR/newcerts/ca.crt /usr/local/share/ca-certificates/ca.crt update-ca-certificates # DNS 설정을 변경합니다. output "dns server settings ..." # 입력이 192.168.0.200 이였다면, # 아래 변수는 0.168.192 가 됩니다. DNS_IP_3ADDR=$(echo $SERVER_IP | awk -F'.' '{OFS="."; print $3,$2,$1}') # 아래 변수는 200이 됩니다. DNS_IP_4TH_ADDR=$(echo $SERVER_IP | awk -F'.' '{print $4}') # /etc/bind/db.0.168.192 cat << 'EOF' > /etc/bind/db.$DNS_IP_3ADDR $TTL 86400 @ IN SOA dawonai.com. root ( 1 ; Serial 604800 ; Refresh 86400 ; Retry 2419200 ; Expire 86400 ) ; Negative Cache TTL ; @ IN NS dawonai.com # 192.168.0.200 @ IN A DJJPROJECT_CONF_SERVER_IP # 200 DJJPROJECT_CONF_4TH_ADDR IN PTR dawonai.com. DJJPROJECT_CONF_4TH_ADDR IN PTR dwmqtt.dawonai.com DJJPROJECT_CONF_4TH_ADDR IN PTR dwapi.dawonai.com EOF # install.sh 에 설정되었던 부분들과 config.sh 에 설정되었던 부분을 수정합니다. sed -i -e "s,DJJPROJECT_CONF_SERVER_IP,$SERVER_IP,g" /etc/bind/db.$DNS_IP_3ADDR sed -i -e "s,DJJPROJECT_CONF_4TH_ADDR,$DNS_IP_4TH_ADDR,g" /etc/bind/db.$DNS_IP_3ADDR sed -i -e "s,DJJPROJECT_CONF_3_ADDR,$DNS_IP_3ADDR,g" /etc/bind/named.conf.local sed -i -e "s,DJJPROJECT_CONF_SERVER_IP,$SERVER_IP,g" /etc/bind/db.dawonai.com # dns 가 정상 설정 되었는지 확인합니다. output "checks dns server lookup ..." /etc/init.d/bind9 stop /etc/init.d/bind9 start nslookup dwmqtt.dawonai.com $SERVER_IP nslookup dwapi.dawonai.com $SERVER_IP nslookup dawonai.com $SERVER_IP # 서버 설정을 변경합니다. output "server configuration ..." # /app/data/config.yml 이 있으면 스킵합니다. if [ ! -f $DATA_DIR/config.yml ]; then output "no configuration file, install example file" # install.sh 에 있던 설정파일을 복사해 옵니다. cp -v $SERVER_DIR/config/config.yml.example $DATA_DIR/config.yml dos2unix $DATA_DIR/config.yml # 인증서 경로와 DB Path 를 설정합니다. sed -i -e "s,ServerCertificate:.*,ServerCertificate: $DATA_DIR/newcerts/S.p12,g" $DATA_DIR/config.yml sed -i -e "s,DbPath:.*,DbPath: $DATA_DIR/PowerManager.sqlite,g" $DATA_DIR/config.yml # 인증서 생성과정을 거치지 않으면 패스워드를 모르기 때문에 사용자에게 입력받습니다. if [ "x$CERTI_PASSWORD" = "x" ]; then output "certificate password" read -p "enter server certificate password: " CERTI_PASSWORD fi # 인증서 비번을 설정합니다. sed -i -e "s,ServerCertificatePassword:.*,ServerCertificatePassword: $CERTI_PASSWORD,g" $DATA_DIR/config.yml output "server configuration finished." cat $DATA_DIR/config.yml echo "" else # 이미 config.yml 이 있으면 아래 출력하고 끝납니다. output "already config.yml file in $DATA_DIR" fi output "finished. please restart containter." |
5. 컨테이너 dockerhub 에 푸쉬
아래와 같이 push 했으며 test2 가 latest 인 상태입니다.
| root@ubuntu:~/dawon_css_server_docker# docker push djjproject/dawon_css_server:latest The push refers to repository [docker.io/djjproject/dawon_css_server] 1b6bf6a71230: Layer already exists 712ffa9776b8: Layer already exists 88abc7c1dbed: Layer already exists e722d396f503: Layer already exists latest: digest: sha256:631550a1267b570cc8fd159270151954b5b6d377f01a8bfa8fc26fe750139ccf size: 1157 |
https://hub.docker.com/r/djjproject/dawon_css_server
6. 컨테이너 구동하기 - macvlan 생성하기
https://blog.djjproject.com/785 의 5번 섹션을 참고하시어 생성하시면 됩니다.
https://blog.djjproject.com/797 로 호스트에서 컨테이너의 macvlan 에 접속되지 않는 문제를 해결 하실 수 있습니다.
7. 컨테이너 구동하기 - pull 및 run
컨테이너가 사용할 폴더를 하나 생성합니다.
| root@debian:~# mkdir -p /opt/powermanager |
컨테이너를 아래와 같이 생성합니다.
| root@debian:~# docker run -dit \ # 백그라운드로 실행 --name powermanager \ # 컨테이너 이름 지정 --restart unless-stopped \ # 사용자가 중지하지 않으면 재시작 --network macvlan \ # 네트워크 macvlan 설정 --ip=192.168.0.200 \ # IP 지정 -v /opt/powermanager:/app/data \ # 볼륨 설정 djjproject/dawon_css_server:latest # 컨테이너 이미지 설정 Unable to find image 'djjproject/dawon_css_server:latest' locally latest: Pulling from djjproject/dawon_css_server 22c5ef60a68e: Pull complete e8d557cb3d1e: Pull complete b6e62fd607fb: Pull complete d5091fc3bd05: Pull complete Digest: sha256:631550a1267b570cc8fd159270151954b5b6d377f01a8bfa8fc26fe750139ccf Status: Downloaded newer image for djjproject/dawon_css_server:latest b7a12cd467ce9eb084e7c6c0aa1c51aa04faf1ac0522521897dd43ada24e68f8 root@debian:~# docker ps CONTAINER ID IMAGE COMMAND CREATED STATUS PORTS NAMES b7a12cd467ce djjproject/dawon_css_server:latest "/bin/bash /app/init…" About a minute ago Up About a minute powermanager |
8. 컨테이너 구동하기 - 설정하기
아래 명령을 통해 설정을 진행합니다.
| root@debian:~# docker exec -it powermanager /app/config.sh # 현 컨테이너가 돌고 있는 IP를 입력합니다. [config] server ip enter server ip: 192.168.0.200 [config] SERVER_IP: 192.168.0.200 # 인증서를 새로 생성합니다. [config] certificate certificate create? [y/n] y # 인증서 비번을 설정합니다. [config] certificate password certificate password: 123456 [config] generate root certificate ... Generating RSA private key, 2048 bit long modulus (2 primes) ........................................................................................................+++++ .......+++++ e is 65537 (0x010001) You are about to be asked to enter information that will be incorporated into your certificate request. What you are about to enter is what is called a Distinguished Name or a DN. There are quite a few fields but you can leave some blank For some fields there will be a default value, If you enter '.', the field will be left blank. ----- Country Name (2 letter code) [KR]:State or Province Name (full name) []:Locality Name (eg, city) []:Organization Name (eg, company) []:Organizational Unit Name (eg, section) []:Common Name (e.g. server FQDN or YOUR name) []:Email Address []: Please enter the following 'extra' attributes to be sent with your certificate request A challenge password []:An optional company name []:Signature ok subject=C = KR, OU = PowerManager Getting Private key [config] generate server certificate ... Generating RSA private key, 2048 bit long modulus (2 primes) .....................................+++++ ...................................................................+++++ e is 65537 (0x010001) You are about to be asked to enter information that will be incorporated into your certificate request. What you are about to enter is what is called a Distinguished Name or a DN. There are quite a few fields but you can leave some blank For some fields there will be a default value, If you enter '.', the field will be left blank. ----- Country Name (2 letter code) [KR]:State or Province Name (full name) []:Locality Name (eg, city) []:Organization Name (eg, company) []:Organizational Unit Name (eg, section) []:Common Name (e.g. server FQDN or YOUR name) []:Email Address []: Please enter the following 'extra' attributes to be sent with your certificate request A challenge password []:An optional company name []:Signature ok subject=C = KR, OU = 192.168.0.200 Getting CA Private Key [config] generate client certificate ... Generating RSA private key, 2048 bit long modulus (2 primes) .................+++++ .........................................................................................+++++ e is 65537 (0x010001) You are about to be asked to enter information that will be incorporated into your certificate request. What you are about to enter is what is called a Distinguished Name or a DN. There are quite a few fields but you can leave some blank For some fields there will be a default value, If you enter '.', the field will be left blank. ----- Country Name (2 letter code) [KR]:State or Province Name (full name) []:Locality Name (eg, city) []:Organization Name (eg, company) []:Organizational Unit Name (eg, section) []:Common Name (e.g. server FQDN or YOUR name) []:Email Address []: Please enter the following 'extra' attributes to be sent with your certificate request A challenge password []:An optional company name []:Signature ok subject=C = KR, CN = PowerManager Getting CA Private Key [config] copy generated certificate files ... '/app/certificate/newcerts' -> '/app/data/newcerts' '/app/certificate/newcerts/ca.crt' -> '/app/data/newcerts/ca.crt' '/app/certificate/newcerts/ca.p12' -> '/app/data/newcerts/ca.p12' '/app/certificate/newcerts/S.crt' -> '/app/data/newcerts/S.crt' '/app/certificate/newcerts/ca.srl' -> '/app/data/newcerts/ca.srl' '/app/certificate/newcerts/S.p12' -> '/app/data/newcerts/S.p12' '/app/certificate/newcerts/C.crt' -> '/app/data/newcerts/C.crt' '/app/certificate/newcerts/C.p12' -> '/app/data/newcerts/C.p12' [config] register root certificate ... # 이 부분은 에러가 아니고 확인 사살을 위해 지우고 새로 cp 하는 것입니다. rm: cannot remove '/usr/local/share/ca-certificates/ca.crt': No such file or directory Updating certificates in /etc/ssl/certs... 0 added, 0 removed; done. Running hooks in /etc/ca-certificates/update.d... done. Updating certificates in /etc/ssl/certs... rehash: warning: skipping ca-certificates.crt,it does not contain exactly one certificate or CRL 1 added, 0 removed; done. Running hooks in /etc/ca-certificates/update.d... done. [config] dns server settings ... [config] checks dns server lookup ... * Stopping domain name service... bind9 waiting for pid 24 to die [ OK ] * Starting domain name service... bind9 [ OK ] Server: 192.168.0.200 Address: 192.168.0.200#53 Name: dwmqtt.dawonai.com Address: 192.168.0.200 Server: 192.168.0.200 Address: 192.168.0.200#53 Name: dwapi.dawonai.com Address: 192.168.0.200 Server: 192.168.0.200 Address: 192.168.0.200#53 Name: dawonai.com Address: 192.168.0.200 # 설정파일이 없어 새로 생성하는 부분입니다. [config] server configuration ... [config] no configuration file, install example file '/app/server/config/config.yml.example' -> '/app/data/config.yml' dos2unix: converting file /app/data/config.yml to Unix format... [config] server configuration finished. # 설정된 config.yml 을 출력해줍니다. WebHttpPort: 80 WebHttpsPort: 443 ServerCertificate: /app/data/newcerts/S.p12 ServerCertificatePassword: 123456 #HTTP2: true #IncludeCipherSuites: # - "TLS_ECDHE_RSA_WITH_AES_256_GCM_SHA384" # - "TLS_ECDHE_RSA_WITH_CHACHA20_POLY1305_SHA256" DbPath: /app/data/PowerManager.sqlite #TelegramToken: "" [config] finished. please restart containter. |
아 위에 오타가 있네요. container 인데 급하게 하느라 containter 로 오타를.. 다음에 고치겠습니다.
설정이 끝났으니 컨테이너를 재시작합니다.
| root@debian:~# docker restart powermanager powermanager |
9. 설정이 제대로 들어갔는지 확인하기
1) DNS 설정
| root@debian:~# docker exec -it powermanager /bin/bash root@b7a12cd467ce:/app# root@b7a12cd467ce:/etc/bind# cat named.conf.local zone "dawonai.com" IN { type master; file "/etc/bind/db.dawonai.com"; allow-update { none; }; allow-transfer { none; }; }; zone "0.168.192.in-addr.arpa" IN { type master; file "/etc/bind/db.0.168.192"; allow-update { none; }; allow-transfer { none; }; }; root@b7a12cd467ce:/etc/bind# cat db.dawonai.com $TTL 86400 @ IN SOA dawonai.com. root ( 1 ; Serial 604800 ; Refresh 86400 ; Retry 2419200 ; Expire 86400 ) ; Negative Cache TTL ; @ IN NS dawonai.com. @ IN A 192.168.0.200 dwmqtt IN A 192.168.0.200 dwapi IN A 192.168.0.200 root@b7a12cd467ce:/etc/bind# cat db.0.168.192 $TTL 86400 @ IN SOA dawonai.com. root ( 1 ; Serial 604800 ; Refresh 86400 ; Retry 2419200 ; Expire 86400 ) ; Negative Cache TTL ; @ IN NS dawonai.com @ IN A 192.168.0.200 200 IN PTR dawonai.com. 200 IN PTR dwmqtt.dawonai.com 200 IN PTR dwapi.dawonai.com |
2) config.yml
| root@b7a12cd467ce:/etc/bind# cat /app/data/config.yml WebHttpPort: 80 WebHttpsPort: 443 ServerCertificate: /app/data/newcerts/S.p12 ServerCertificatePassword: 123456 #HTTP2: true #IncludeCipherSuites: # - "TLS_ECDHE_RSA_WITH_AES_256_GCM_SHA384" # - "TLS_ECDHE_RSA_WITH_CHACHA20_POLY1305_SHA256" DbPath: /app/data/PowerManager.sqlite |
호스트에서 아래와 같이 확인할 수 있습니다.
| root@debian:~# cd /opt/powermanager/ root@debian:/opt/powermanager# ls config.yml newcerts PowerManager.sqlite-shm tempature_statistics.json log PowerManager.sqlite PowerManager.sqlite-wal watt_statistics.json |
10. 접속할 대상 PC에 인증서 등록하기
/opt/powermanager/newcerts 폴더를 밖으로 가져옵니다.
| root@debian:/opt/powermanager# cp -ar newcerts/ /media/data/ |

아래와 같이 등록합니다.
https://blog.djjproject.com/798 - 7번 섹션과 내용이 같습니다.
인증서를 윈도우에서 아래와 같이 등록합니다.

먼저 루트 인증서를 더블클릭해서 등록합니다.


로컬 컴퓨터를 선택하고 다음을 누릅니다.

모든 인증서를 다음 저장소에 저장을 체크하고 찾아보기를 누릅니다.

신뢰할 수 있는 루트 인증기관을 선택합니다.
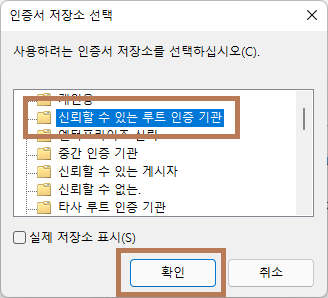
다음을 누릅니다.

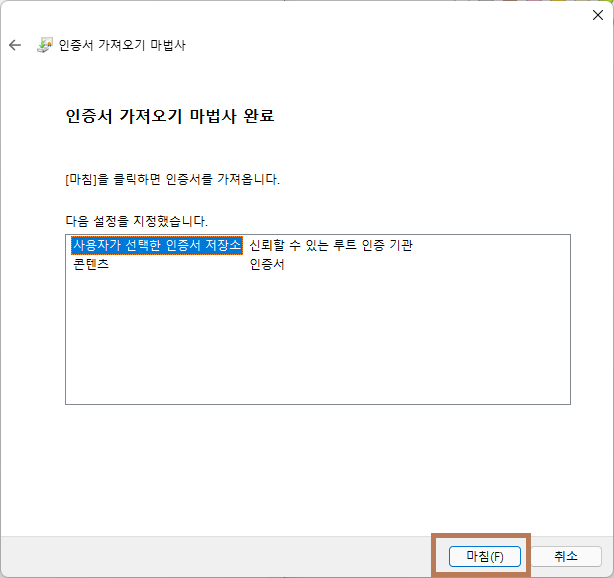
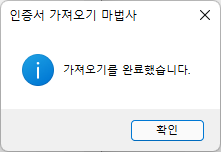
다음으로 클라이언트 인증서를 더블클릭하여 열어서 등록합니다.

현재 사용자를 선택하고 다음을 누릅니다.

다음을 누릅니다.
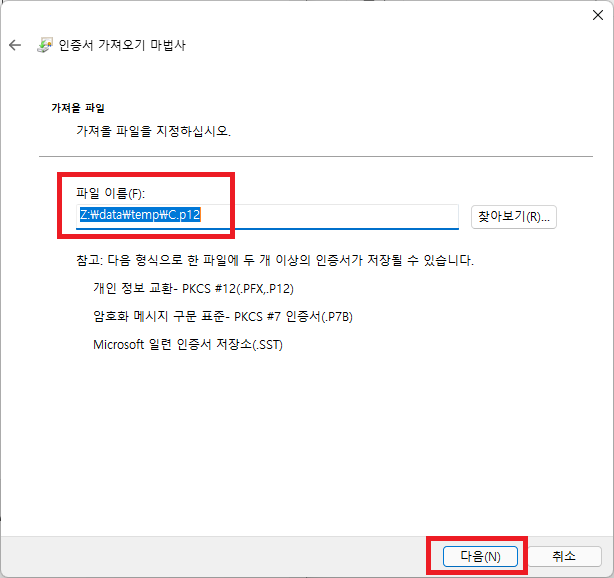
4번 섹션에서 클라이언트 인증서를 생성할 때 입력했던 비밀번호를 넣고 다음을 누릅니다.

모든 인증서를 다음 저장소에 저장을 체크하고 찾아보기를 누릅니다.

개인용을 선택합니다.
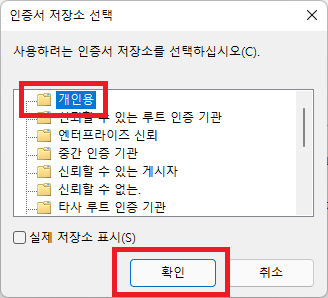
다음을 누릅니다.


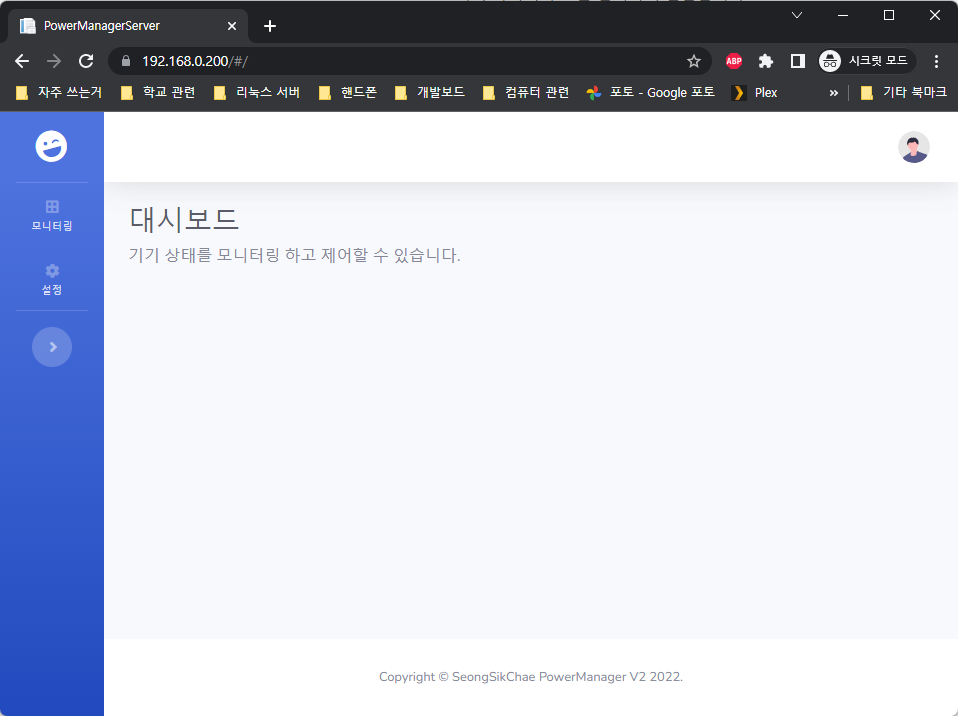
11. 웹 UI 접근하기
서버 아이피 주소를 입력하여 접근합니다.
접속할 때 사용할 인증서를 물어봅니다.
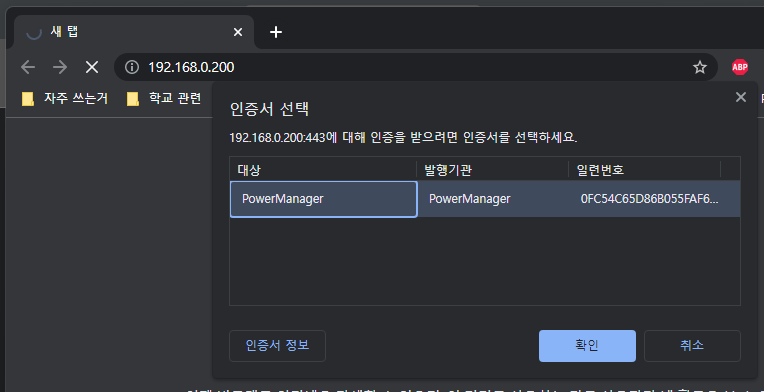
선택하여 접근하면 WebUI가 나타납니다.
12. 플러그를 위한 공유기 설정하기
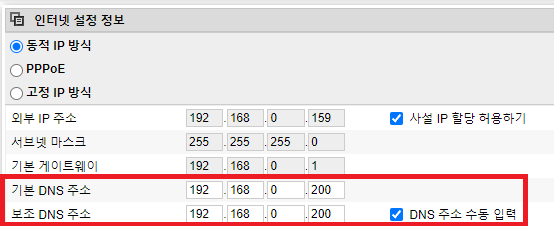
남는 공유기를 통해 무선 WAN 으로 설정하고 DNS만 서버 IP로 수정합니다.
13. 플러그 등록하기
등록 프로그램은 아래에서 받습니다.
https://github.com/SeongSikChae/PowerManagerConfig/releases
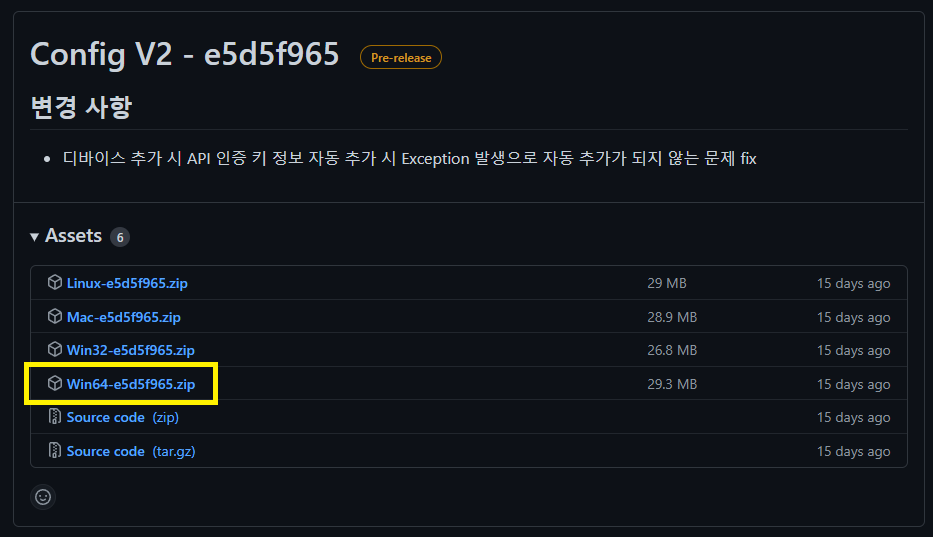
newcerts 폴더에서 C.p12 파일을 복사하여 아래와 같이 배치합니다.

주소창에 cmd 라고 입력하면 현재위치에서 cmd 가 열립니다.


먼저 플러그 와이파이에 연결합니다.

다음으로 아래 명령으로 등록합니다.
아래 등록과정은 244.1 제품에 해당하는 것으로 기타 등록 방법은 아래를 참고하시길 바랍니다.
https://github.com/SeongSikChae/PowerManagerDocument/releases
| C:\Users\USER\Downloads\Win64-v1.0.1>PowerManagerConfig.exe --host 192.168.244.1 --port 5000 --web_server_addr https://192.168.0.200/ --clientCertificate C.p12 --clientCertificatePassword 123456 Common.Logging Revision: 362ee1b0 Common.Core Revision: 362ee1b0 PowerManagerConfig Revision: b4e6864b [::ffff:192.168.244.1]:5000 Connected Mode V1 (B540 <= v1.01.26) or V2 (B540 == v1.01.28) or V3 (B540 == v1.01.30) or V4 (B550) (default V1): V3 [DUT->PC] START_OK:2ef432510027# SSID: PowerManager Wifi Password: 12345678 UserId: test@naver.com/naver Model: B540_W Mqtt Topic: dwd Push: {"mac":"2ef432510027","api_server_addr":"dwapi.dawonai.com","api_server_port":"18443","server_addr":"dwmqtt.dawonai.com","server_port":"8883","ssl_support":"yes","ssid":"PowerManager","pass":"12345678","user_id":"test@naver.com/naver","company":"DAWONDNS","model":"B540_W","lati":"37.6523018","long":"127.0622559","topic":"dwd"} Send: 332 Byte. {"mac":"2ef432510027","respone":"OK"} 37 {"mac":"2ef432510027","respone":"OK"} 네트워크를 정상화 시킨 후 Enter를 입력하세요. verify: zgL=Xgqyl;sfdhlsdkfjsdlfjkklzjxlkcxjvcrOq6FJ mqtt_key: sdfsddsfsdlfdslfsd |
14. 이 이후 진행
플러그 등록이 정상적으로 되지 않고, server[date].log 는 아래의 로그가 남아 있습니다.
| 2022-08-15 02:45:16.269 +09:00 [Warning] [Microsoft.AspNetCore.DataProtection.KeyManagement.XmlKeyManager.Microsoft.AspNetCore.DataProtection.KeyManagement.Internal.IInternalXmlKeyManager.CreateNewKey:0] No XML encryptor configured. Key {6f6cedc7-d91a-462b-bf66-09d3896974f2} may be persisted to storage in unencrypted form. 2022-08-15 02:45:19.296 +09:00 [Information] [System.Threading.Tasks.CustomTaskScheduler.ITaskWorker.unknown_method:0] task 'StatisticsPersistentTask' starting. 2022-08-15 02:45:19.309 +09:00 [Information] [System.Threading.Tasks.CustomTaskScheduler.ITaskWorker.unknown_method:0] task 'StatisticsPersistentTask' started. 2022-08-15 02:45:19.368 +09:00 [Information] [PowerManagerServer.Mqtt.MqttNetLogger.Publish:27] MqttServerKeepAliveMonitor: Starting keep alive monitor. 2022-08-15 02:45:19.370 +09:00 [Information] [PowerManagerServer.Mqtt.MqttNetLogger.Publish:27] MqttTcpServerListener: Starting TCP listener for 0.0.0.0:1803 TLS=False. 2022-08-15 02:45:19.386 +09:00 [Information] [PowerManagerServer.Mqtt.MqttNetLogger.Publish:27] MqttTcpServerListener: Starting TCP listener for [::]:1803 TLS=False. 2022-08-15 02:45:19.393 +09:00 [Information] [PowerManagerServer.Mqtt.MqttNetLogger.Publish:27] MqttTcpServerListener: Starting TCP listener for 0.0.0.0:8883 TLS=True. 2022-08-15 02:45:19.394 +09:00 [Information] [PowerManagerServer.Mqtt.MqttNetLogger.Publish:27] MqttTcpServerListener: Starting TCP listener for [::]:8883 TLS=True. 2022-08-15 02:45:19.394 +09:00 [Information] [PowerManagerServer.Mqtt.MqttNetLogger.Publish:27] MqttServer: Started. 2022-08-15 02:45:19.713 +09:00 [Warning] [Microsoft.AspNetCore.Server.Kestrel.unknown_method:0] Overriding address(es) 'http://localhost:80, https://localhost:443, https://localhost:18443'. Binding to endpoints defined via IConfiguration and/or UseKestrel() instead. 2022-08-15 02:45:19.861 +09:00 [Information] [Microsoft.Hosting.Lifetime.unknown_method:0] Now listening on: http://0.0.0.0:80 2022-08-15 02:45:19.862 +09:00 [Information] [Microsoft.Hosting.Lifetime.unknown_method:0] Now listening on: https://0.0.0.0:443 2022-08-15 02:45:19.862 +09:00 [Information] [Microsoft.Hosting.Lifetime.unknown_method:0] Now listening on: https://0.0.0.0:18443 2022-08-15 02:45:19.868 +09:00 [Information] [PowerManagerServer.Startup.OnStarted:181] Common.Logging Revision: 32774953 2022-08-15 02:45:19.869 +09:00 [Information] [PowerManagerServer.Startup.OnStarted:182] Common.Core Revision: 31a17c79 2022-08-15 02:45:19.870 +09:00 [Information] [PowerManagerServer.Startup.OnStarted:183] PowerManagerServer Revision: 449885d5 2022-08-15 02:45:19.870 +09:00 [Information] [PowerManagerServer.Startup.OnStarted:184] PowerManagerServer Started. 2022-08-15 02:45:19.871 +09:00 [Information] [Microsoft.Hosting.Lifetime.unknown_method:0] Application started. Press Ctrl+C to shut down. 2022-08-15 02:45:19.871 +09:00 [Information] [Microsoft.Hosting.Lifetime.unknown_method:0] Hosting environment: Production 2022-08-15 02:45:19.871 +09:00 [Information] [Microsoft.Hosting.Lifetime.unknown_method:0] Content root path: /app/server 2022-08-15 02:55:07.939 +09:00 [Error] [Microsoft.AspNetCore.Diagnostics.ExceptionHandlerMiddleware.lambda_method46:0] An unhandled exception has occurred while executing the request. System.Exception: Device Auth Not Found at PowerManagerServer.Controllers.ApiController.Create(CreateRequest request) in E:\Git\PowerManagerV2\PowerManagerServer\Controllers\ApiController.cs:line 58 at lambda_method46(Closure , Object , Object[] ) at Microsoft.AspNetCore.Mvc.Infrastructure.ActionMethodExecutor.SyncObjectResultExecutor.Execute(IActionResultTypeMapper mapper, ObjectMethodExecutor executor, Object controller, Object[] arguments) at Microsoft.AspNetCore.Mvc.Infrastructure.ControllerActionInvoker.InvokeActionMethodAsync() at Microsoft.AspNetCore.Mvc.Infrastructure.ControllerActionInvoker.Next(State& next, Scope& scope, Object& state, Boolean& isCompleted) at Microsoft.AspNetCore.Mvc.Infrastructure.ControllerActionInvoker.InvokeNextActionFilterAsync() --- End of stack trace from previous location --- at Microsoft.AspNetCore.Mvc.Infrastructure.ControllerActionInvoker.Rethrow(ActionExecutedContextSealed context) at Microsoft.AspNetCore.Mvc.Infrastructure.ControllerActionInvoker.Next(State& next, Scope& scope, Object& state, Boolean& isCompleted) at Microsoft.AspNetCore.Mvc.Infrastructure.ControllerActionInvoker.InvokeInnerFilterAsync() --- End of stack trace from previous location --- at Microsoft.AspNetCore.Mvc.Infrastructure.ResourceInvoker.<InvokeNextResourceFilter>g__Awaited|25_0(ResourceInvoker invoker, Task lastTask, State next, Scope scope, Object state, Boolean isCompleted) at Microsoft.AspNetCore.Mvc.Infrastructure.ResourceInvoker.Rethrow(ResourceExecutedContextSealed context) at Microsoft.AspNetCore.Mvc.Infrastructure.ResourceInvoker.Next(State& next, Scope& scope, Object& state, Boolean& isCompleted) at Microsoft.AspNetCore.Mvc.Infrastructure.ResourceInvoker.InvokeFilterPipelineAsync() --- End of stack trace from previous location --- at Microsoft.AspNetCore.Mvc.Infrastructure.ResourceInvoker.<InvokeAsync>g__Awaited|17_0(ResourceInvoker invoker, Task task, IDisposable scope) at Microsoft.AspNetCore.Mvc.Infrastructure.ResourceInvoker.<InvokeAsync>g__Awaited|17_0(ResourceInvoker invoker, Task task, IDisposable scope) at Microsoft.AspNetCore.Routing.EndpointMiddleware.<Invoke>g__AwaitRequestTask|6_0(Endpoint endpoint, Task requestTask, ILogger logger) at Microsoft.AspNetCore.Authorization.AuthorizationMiddleware.Invoke(HttpContext context) at Microsoft.AspNetCore.Authentication.AuthenticationMiddleware.Invoke(HttpContext context) at PowerManagerServer.RequestLoggingMiddleware.Invoke(HttpContext context) in E:\Git\PowerManagerV2\PowerManagerServer\RequestLoggingMiddleware.cs:line 64 at Microsoft.AspNetCore.Diagnostics.ExceptionHandlerMiddleware.<Invoke>g__Awaited|6_0(ExceptionHandlerMiddleware middleware, HttpContext context, Task task) 2022-08-15 02:55:07.955 +09:00 [Error] [Microsoft.AspNetCore.Server.Kestrel.unknown_method:0] Connection id "0HMJU3LVDPOAP", Request id "0HMJU3LVDPOAP:00000002": An unhandled exception was thrown by the application. System.InvalidOperationException: The exception handler configured on ExceptionHandlerOptions produced a 404 status response. This InvalidOperationException containing the original exception was thrown since this is often due to a misconfigured ExceptionHandlingPath. If the exception handler is expected to return 404 status responses then set AllowStatusCode404Response to true. ---> System.Exception: Device Auth Not Found at PowerManagerServer.Controllers.ApiController.Create(CreateRequest request) in E:\Git\PowerManagerV2\PowerManagerServer\Controllers\ApiController.cs:line 58 at lambda_method46(Closure , Object , Object[] ) at Microsoft.AspNetCore.Mvc.Infrastructure.ActionMethodExecutor.SyncObjectResultExecutor.Execute(IActionResultTypeMapper mapper, ObjectMethodExecutor executor, Object controller, Object[] arguments) at Microsoft.AspNetCore.Mvc.Infrastructure.ControllerActionInvoker.InvokeActionMethodAsync() at Microsoft.AspNetCore.Mvc.Infrastructure.ControllerActionInvoker.Next(State& next, Scope& scope, Object& state, Boolean& isCompleted) at Microsoft.AspNetCore.Mvc.Infrastructure.ControllerActionInvoker.InvokeNextActionFilterAsync() --- End of stack trace from previous location --- at Microsoft.AspNetCore.Mvc.Infrastructure.ControllerActionInvoker.Rethrow(ActionExecutedContextSealed context) at Microsoft.AspNetCore.Mvc.Infrastructure.ControllerActionInvoker.Next(State& next, Scope& scope, Object& state, Boolean& isCompleted) at Microsoft.AspNetCore.Mvc.Infrastructure.ControllerActionInvoker.InvokeInnerFilterAsync() --- End of stack trace from previous location --- at Microsoft.AspNetCore.Mvc.Infrastructure.ResourceInvoker.<InvokeNextResourceFilter>g__Awaited|25_0(ResourceInvoker invoker, Task lastTask, State next, Scope scope, Object state, Boolean isCompleted) at Microsoft.AspNetCore.Mvc.Infrastructure.ResourceInvoker.Rethrow(ResourceExecutedContextSealed context) at Microsoft.AspNetCore.Mvc.Infrastructure.ResourceInvoker.Next(State& next, Scope& scope, Object& state, Boolean& isCompleted) at Microsoft.AspNetCore.Mvc.Infrastructure.ResourceInvoker.InvokeFilterPipelineAsync() --- End of stack trace from previous location --- at Microsoft.AspNetCore.Mvc.Infrastructure.ResourceInvoker.<InvokeAsync>g__Awaited|17_0(ResourceInvoker invoker, Task task, IDisposable scope) at Microsoft.AspNetCore.Mvc.Infrastructure.ResourceInvoker.<InvokeAsync>g__Awaited|17_0(ResourceInvoker invoker, Task task, IDisposable scope) at Microsoft.AspNetCore.Routing.EndpointMiddleware.<Invoke>g__AwaitRequestTask|6_0(Endpoint endpoint, Task requestTask, ILogger logger) at Microsoft.AspNetCore.Authorization.AuthorizationMiddleware.Invoke(HttpContext context) at Microsoft.AspNetCore.Authentication.AuthenticationMiddleware.Invoke(HttpContext context) at PowerManagerServer.RequestLoggingMiddleware.Invoke(HttpContext context) in E:\Git\PowerManagerV2\PowerManagerServer\RequestLoggingMiddleware.cs:line 64 at Microsoft.AspNetCore.Diagnostics.ExceptionHandlerMiddleware.<Invoke>g__Awaited|6_0(ExceptionHandlerMiddleware middleware, HttpContext context, Task task) --- End of inner exception stack trace --- at Microsoft.AspNetCore.Diagnostics.ExceptionHandlerMiddleware.HandleException(HttpContext context, ExceptionDispatchInfo edi) at Microsoft.AspNetCore.Diagnostics.ExceptionHandlerMiddleware.<Invoke>g__Awaited|6_0(ExceptionHandlerMiddleware middleware, HttpContext context, Task task) at Microsoft.AspNetCore.Server.Kestrel.Core.Internal.Http.HttpProtocol.ProcessRequests[TContext](IHttpApplication`1 application) 2022-08-15 02:55:09.580 +09:00 [Error] [Microsoft.AspNetCore.Diagnostics.ExceptionHandlerMiddleware.unknown_method:0] An unhandled exception has occurred while executing the request. System.InvalidOperationException: The SPA default page middleware could not return the default page '/index.html' because it was not found, and no other middleware handled the request. Your application is running in Production mode, so make sure it has been published, or that you have built your SPA manually. Alternatively you may wish to switch to the Development environment. at Microsoft.AspNetCore.SpaServices.SpaDefaultPageMiddleware.<>c__DisplayClass0_0.<Attach>b__1(HttpContext context, RequestDelegate next) at Microsoft.AspNetCore.Builder.UseExtensions.<>c__DisplayClass1_1.<Use>b__1(HttpContext context) at Microsoft.AspNetCore.StaticFiles.StaticFileMiddleware.Invoke(HttpContext context) at Microsoft.AspNetCore.SpaServices.SpaDefaultPageMiddleware.<>c__DisplayClass0_0.<Attach>b__0(HttpContext context, RequestDelegate next) at Microsoft.AspNetCore.Builder.UseExtensions.<>c__DisplayClass1_1.<Use>b__1(HttpContext context) at Microsoft.AspNetCore.Routing.EndpointMiddleware.Invoke(HttpContext httpContext) at Microsoft.AspNetCore.Authorization.AuthorizationMiddleware.Invoke(HttpContext context) at Microsoft.AspNetCore.Authentication.AuthenticationMiddleware.Invoke(HttpContext context) at PowerManagerServer.RequestLoggingMiddleware.Invoke(HttpContext context) in E:\Git\PowerManagerV2\PowerManagerServer\RequestLoggingMiddleware.cs:line 64 at Microsoft.AspNetCore.Diagnostics.ExceptionHandlerMiddleware.<Invoke>g__Awaited|6_0(ExceptionHandlerMiddleware middleware, HttpContext context, Task task) 2022-08-15 02:55:09.582 +09:00 [Error] [Microsoft.AspNetCore.Diagnostics.ExceptionHandlerMiddleware.unknown_method:0] An exception was thrown attempting to execute the error handler. System.InvalidOperationException: The SPA default page middleware could not return the default page '/index.html' because it was not found, and no other middleware handled the request. Your application is running in Production mode, so make sure it has been published, or that you have built your SPA manually. Alternatively you may wish to switch to the Development environment. at Microsoft.AspNetCore.SpaServices.SpaDefaultPageMiddleware.<>c__DisplayClass0_0.<Attach>b__1(HttpContext context, RequestDelegate next) at Microsoft.AspNetCore.Builder.UseExtensions.<>c__DisplayClass1_1.<Use>b__1(HttpContext context) at Microsoft.AspNetCore.StaticFiles.StaticFileMiddleware.Invoke(HttpContext context) at Microsoft.AspNetCore.SpaServices.SpaDefaultPageMiddleware.<>c__DisplayClass0_0.<Attach>b__0(HttpContext context, RequestDelegate next) at Microsoft.AspNetCore.Builder.UseExtensions.<>c__DisplayClass1_1.<Use>b__1(HttpContext context) at Microsoft.AspNetCore.Routing.EndpointMiddleware.Invoke(HttpContext httpContext) at Microsoft.AspNetCore.Authorization.AuthorizationMiddleware.Invoke(HttpContext context) at Microsoft.AspNetCore.Authentication.AuthenticationMiddleware.Invoke(HttpContext context) at PowerManagerServer.RequestLoggingMiddleware.Invoke(HttpContext context) in E:\Git\PowerManagerV2\PowerManagerServer\RequestLoggingMiddleware.cs:line 64 at Microsoft.AspNetCore.Diagnostics.ExceptionHandlerMiddleware.HandleException(HttpContext context, ExceptionDispatchInfo edi) 2022-08-15 02:55:09.584 +09:00 [Error] [Microsoft.AspNetCore.Server.Kestrel.unknown_method:0] Connection id "0HMJU3LVDPOAQ", Request id "0HMJU3LVDPOAQ:00000002": An unhandled exception was thrown by the application. System.InvalidOperationException: The SPA default page middleware could not return the default page '/index.html' because it was not found, and no other middleware handled the request. Your application is running in Production mode, so make sure it has been published, or that you have built your SPA manually. Alternatively you may wish to switch to the Development environment. at Microsoft.AspNetCore.SpaServices.SpaDefaultPageMiddleware.<>c__DisplayClass0_0.<Attach>b__1(HttpContext context, RequestDelegate next) at Microsoft.AspNetCore.Builder.UseExtensions.<>c__DisplayClass1_1.<Use>b__1(HttpContext context) at Microsoft.AspNetCore.StaticFiles.StaticFileMiddleware.Invoke(HttpContext context) at Microsoft.AspNetCore.SpaServices.SpaDefaultPageMiddleware.<>c__DisplayClass0_0.<Attach>b__0(HttpContext context, RequestDelegate next) at Microsoft.AspNetCore.Builder.UseExtensions.<>c__DisplayClass1_1.<Use>b__1(HttpContext context) at Microsoft.AspNetCore.Routing.EndpointMiddleware.Invoke(HttpContext httpContext) at Microsoft.AspNetCore.Authorization.AuthorizationMiddleware.Invoke(HttpContext context) at Microsoft.AspNetCore.Authentication.AuthenticationMiddleware.Invoke(HttpContext context) at PowerManagerServer.RequestLoggingMiddleware.Invoke(HttpContext context) in E:\Git\PowerManagerV2\PowerManagerServer\RequestLoggingMiddleware.cs:line 64 at Microsoft.AspNetCore.Diagnostics.ExceptionHandlerMiddleware.<Invoke>g__Awaited|6_0(ExceptionHandlerMiddleware middleware, HttpContext context, Task task) at Microsoft.AspNetCore.Diagnostics.ExceptionHandlerMiddleware.HandleException(HttpContext context, ExceptionDispatchInfo edi) at Microsoft.AspNetCore.Diagnostics.ExceptionHandlerMiddleware.<Invoke>g__Awaited|6_0(ExceptionHandlerMiddleware middleware, HttpContext context, Task task) at Microsoft.AspNetCore.Server.Kestrel.Core.Internal.Http.HttpProtocol.ProcessRequests[TContext](IHttpApplication`1 application) |
추후 해결이 되면 글을 업데이트 하겠습니다.
감사합니다.
일단은 위의 에러에서
| ---> System.Exception: Device Auth Not Found |
이는 플러그가 접속했지만 인증 키값이 api 서버에 등록되지 않아서 발생하는 문제입니다.
즉, config 프로그램을 구버전을 사용하여 정상적으로 등록과정이 진행되지 않았던 것입니다.
15. 문제 해결
아... 제가 전에 시도하면서 config 프로그램을 이전 버전을 사용하여 작동이 안되는 것이였습니다.
등록 프로그램을 아래 버전을 받고 시도하면 정상 작동합니다.
https://github.com/SeongSikChae/PowerManagerConfig/releases

다시 시도해 보겠습니다.
| C:\Users\USER\Downloads\Win64-e5d5f965>PowerManagerConfig.exe --host 192.168.244.1 --port 5000 --web_server_addr https://192.168.0.200 --clientCertificate C.p12 --clientCertificatePassword 123456 Common.Logging Revision: 32774953 Common.Core Revision: 31a17c79 PowerManagerConfig Revision: e5d5f965 [::ffff:192.168.244.1]:5000 Connected Mode V1 (B540 <= v1.01.26) or V2 (B540 == v1.01.28) or V3 (B540 == v1.01.30) or V4 (B550) (default V1): V3 [DUT->PC] START_OK:2ef432510027# SSID: PowerManager Wifi Password: 12345678 # AIPM 에서 사용하는 계정 정보를 입력합니다. # test@google.com/google 이렇게도 가능합니다. UserId: test@naver.com/naver Model: B540_W Mqtt Topic: dwd Push: {"mac":"2ef432510027","api_server_addr":"dwapi.dawonai.com","api_server_port":"18443","server_addr":"dwmqtt.dawonai.com","server_port":"8883","ssl_support":"yes","ssid":"PowerManager","pass":"12345678","user_id":"test@naver.com/naver","company":"DAWONDNS","model":"B540_W","lati":"37.6523018","long":"127.0622559","topic":"dwd"} Send: 332 Byte. {"mac":"2ef432510027","respone":"OK"} 37 {"mac":"2ef432510027","respone":"OK"} 네트워크를 정상화 시킨 후 Enter를 입력하세요. verify: zgsdffsdfsdfsddddddddd mqtt_key: sdfsdfsdfsdfsdfsdf {"time":1660564616786,"statusCode":"Success","code":null,"message":null} |
서버 로그에는 플러그가 정상 연결되면 아래와 같이 로그가 남습니다.
| 2022-08-15 22:36:23.583 +09:00 [Error] [PowerManagerServer.Mqtt.MqttNetLogger.unknown_method:0] MqttClientSessionsManager: Unknown Device: '2ef432510027' 'DAWONDNS-B540_W-2ef432510027' 'sdfsdfsdfsdfsdfsdf' System.Exception: Unknown Device: '2ef432510027' 'DAWONDNS-B540_W-2ef432510027' 'sdfsdfsdfsdfsdfsdf' at MQTTnet.Server.Internal.MqttClientSessionsManager.ValidateConnection(MqttConnectPacket connectPacket, IMqttChannelAdapter channelAdapter) at MQTTnet.Server.Internal.MqttClientSessionsManager.HandleClientConnectionAsync(IMqttChannelAdapter channelAdapter, CancellationToken cancellationToken) |
플러그 등록과정을 거치지 않아 mqtt 서버에 접근을 못하는 상태입니다.
16. 플러그 등록
webui 에서 아래와 같이 등록을 수행합니다.
등록할 때 나온 로그 기준으로 등록을 하시면 됩니다.
| Mqtt Topic: dwd Push: {"mac":"2ef432510027","api_server_addr":"dwapi.dawonai.com","api_server_port":"18443","server_addr":"dwmqtt.dawonai.com","server_port":"8883","ssl_support":"yes","ssid":"PowerManager","pass":"12345678","user_id":"test@naver.com/naver","company":"DAWONDNS","model":"B540_W","lati":"37.6523018","long":"127.0622559","topic":"dwd"} Send: 332 Byte. {"mac":"2ef432510027","respone":"OK"} 37 {"mac":"2ef432510027","respone":"OK"} 네트워크를 정상화 시킨 후 Enter를 입력하세요. verify: zgsdffsdfsdfsddddddddd mqtt_key: sdfsdfsdfsdfsdfsdf {"time":1660564616786,"statusCode":"Success","code":null,"message":null} |

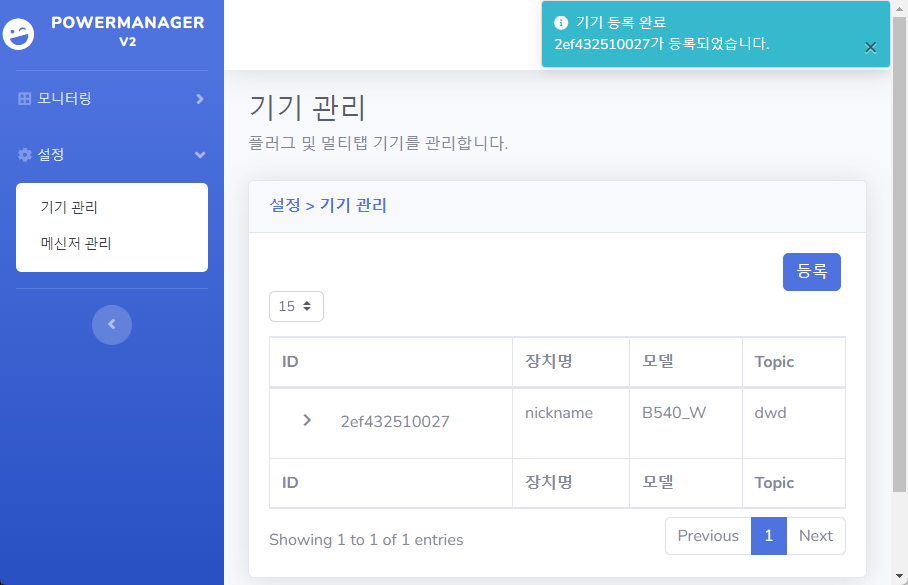
등록을 하게 되면 서버 로그에 아래의 로그가 남고 정상 동작하게 됩니다.
| er.unknown_method:0] task 'STATUS_SYNC_TASK-2ef432510027' starting. 2022-08-15 22:39:23.875 +09:00 [Information] [PowerManagerServer.Mqtt.MqttNetLogger.unknown_method:0] MqttClientConnection: Client 'DAWONDNS-2ef432510027': Session started. 2022-08-15 22:39:23.876 +09:00 [Information] [System.Threading.Tasks.CustomTaskScheduler.ITaskWorker.unknown_method:0] task 'STATUS_SYNC_TASK-2ef432510027' started. |

17. 플러그 용 공유기가 없을 때
오늘 새벽 아래의 글을 작성했습니다.
https://blog.djjproject.com/808
일단 wifiap 가 정상 동작한다는 가정하에, 아래의 추가 수정을 합니다.
macvlan 네트워크의 경우 호스트에서 접근하지 못하는 문제가 있습니다.
아래의 글을 참고하여 네트워크를 수정합니다.
https://blog.djjproject.com/797
| # 저는 이더넷 이름이 vmbr0 입니다. (eth0 enpXsX 일 수도 있습니다.) root@debian:~# ip link add macvlan-shim link vmbr0 type macvlan mode bridge # 네트워크 대역에서 빈 곳을 하나 지정해서 ip 추가해줍니다. root@debian:~# ip addr add 192.168.0.234/24 dev macvlan-shim # 인터페이스를 up 시켜줍니다. root@debian:~# ip link set macvlan-shim up # 파워매니저 서버가 돌고있는 ip를 route 추가 해줍니다. root@debian:~# ip route add 192.168.0.200 dev macvlan-shim |
일단 192.168.0.200 이 호스트에서 연결이 가능한지 확인합니다.
인증서가 등록이 되어 있지 않아 에러가 나지만 정상 연결 됩니다.
| root@debian:~# curl https://192.168.0.200 curl: (60) SSL certificate problem: unable to get local issuer certificate More details here: https://curl.haxx.se/docs/sslcerts.html curl failed to verify the legitimacy of the server and therefore could not establish a secure connection to it. To learn more about this situation and how to fix it, please visit the web page mentioned above. |
그리고 위의 스크립트를 init 스크립트나 rc.local 에 등록합니다.
nmcli 의 post-up-d 를 통해 등록할 수 있지만 귀찮아서 init 스크립트에 등록합니다.
| root@debian:~# cat /opt/scripts/init.sh # macvlan powermanager ip link add macvlan-shim link vmbr0 type macvlan mode bridge ip addr add 192.168.0.234/24 dev macvlan-shim ip link set macvlan-shim up ip route add 192.168.0.200 dev macvlan-shim |
wifiap 컨테이너 설정을 변경합니다.
해당 와이파이를 PowerManager 전용으로 사용하기 위해 아래의 명령으로 다시 생성합니다.
| root@debian:/opt/wifiap# docker run --restart unless-stopped -dit --name wifiap -e INTERFACE=wlo2 -e OUTGOINGS=macvlan-shim --net host --privileged offlinehacker/docker-ap |
내부적으로 /bin/wlanstart.sh 에 dhcpd 설정이 들어 있습니다.
| root@debian:/opt/wifiap# docker cp wifiap:/bin/wlanstart.sh . root@debian:/opt/wifiap# vi wlanstart.sh 110 echo "Configuring DHCP server .." 111 112 cat > "/etc/dhcp/dhcpd.conf" <<EOF 113 option domain-name-servers 192.168.0.200, 192.168.0.200; 114 option subnet-mask 255.255.255.0; 115 option routers ${AP_ADDR}; 116 subnet ${SUBNET} netmask 255.255.255.0 { 117 range ${SUBNET::-1}100 ${SUBNET::-1}200; 118 } 119 EOF |
설정값을 다시 넣어주고 재시작 합니다.
| root@debian:/opt/wifiap# docker cp wlanstart.sh wifiap:/bin/wlanstart.sh root@debian:/opt/wifiap# docker restart wifiap root@debian:/opt/wifiap# docker logs -f wifiap --tail 10 PID file: /run/dhcp/dhcpd.pid Wrote 1 leases to leases file. Listening on LPF/wlo2/50:76:af:ac:0e:6d/192.168.254.0/24 Sending on LPF/wlo2/50:76:af:ac:0e:6d/192.168.254.0/24 Sending on Socket/fallback/fallback-net Starting HostAP daemon ... Configuration file: /etc/hostapd.conf Using interface wlo2 with hwaddr 50:76:af:ac:0e:6d and ssid "j5005" wlo2: interface state UNINITIALIZED->ENABLED wlo2: AP-ENABLED |
플러그를 hostapd 가 만든 와이파이로 연결할 수 있게 재 연결합니다.
| C:\Users\USER\Downloads\Win64-e5d5f965>PowerManagerConfig.exe --host 192.168.244.1 --port 5000 --web_server_addr https://192.168.0.200 --clientCertificate C.p12 --clientCertificatePassword 123456 Common.Logging Revision: 32774953 Common.Core Revision: 31a17c79 PowerManagerConfig Revision: e5d5f965 [::ffff:192.168.244.1]:5000 Connected Mode V1 (B540 <= v1.01.26) or V2 (B540 == v1.01.28) or V3 (B540 == v1.01.30) or V4 (B550) (default V1): V3 [DUT->PC] START_OK:2ef432510027# SSID: j5005 Wifi Password: 12345678 UserId: test@naver.com/naver Model: B540_W Mqtt Topic: dwd Push: {"mac":"2ef432510027","api_server_addr":"dwapi.dawonai.com","api_server_port":"18443","server_addr":"dwmqtt.dawonai.com","server_port":"8883","ssl_support":"yes","ssid":"j5005","pass":"12345678","user_id":"test@naver.com/naver","company":"DAWONDNS","model":"B540_W","lati":"37.6523018","long":"127.0622559","topic":"dwd"} Send: 325 Byte. {"mac":"2ef432510027","respone":"OK"} 37 {"mac":"2ef432510027","respone":"OK"} 네트워크를 정상화 시킨 후 Enter를 입력하세요. verify: mqtt_key: {"time":1660571564758,"statusCode":"Success","code":null,"message":null} |
그러면 wifiap 로그에 플러그가 연결했다는 로그가 나옵니다.
| Using interface wlo2 with hwaddr 50:76:af:ac:0e:6d and ssid "j5005" wlo2: interface state UNINITIALIZED->ENABLED wlo2: AP-ENABLED wlo2: STA 2c:f4:32:51:00:27 IEEE 802.11: authenticated wlo2: STA 2c:f4:32:51:00:27 IEEE 802.11: associated (aid 1) wlo2: AP-STA-CONNECTED 2c:f4:32:51:00:27 wlo2: STA 2c:f4:32:51:00:27 RADIUS: starting accounting session 9CD439C048801956 wlo2: STA 2c:f4:32:51:00:27 WPA: pairwise key handshake completed (RSN) |
아래와 같이 잘 작동하며, 아이피도 wifiap 설정 당시 ip 로 잘 잡혀있는 것을 확인할 수 있습니다.
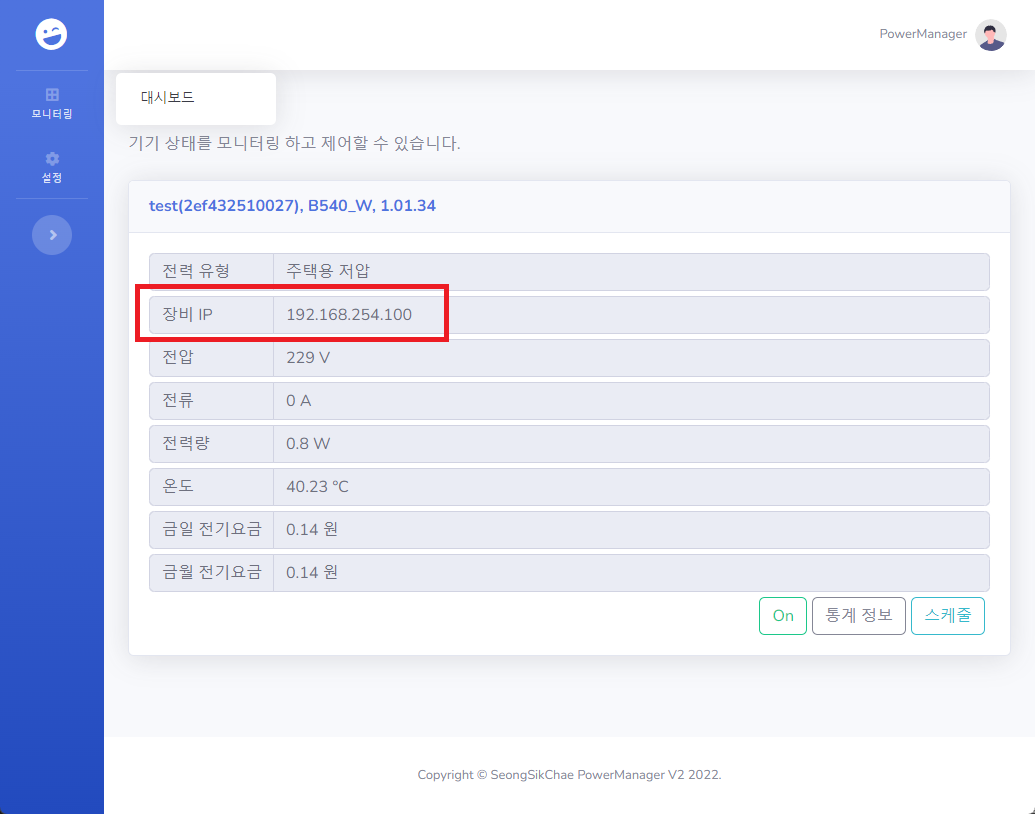
감사합니다. 일단 여기서 이 글은 마치겠습니다.
감사합니다.
'서버 > 리눅스 서버' 카테고리의 다른 글
| Proxmox SSD 용량 확장(파티션 및 LVM) 마이그레이션 진행기 (385) | 2022.08.18 |
|---|---|
| Docker 컨테이너로 와이파이 AP 만들기 (Intel NUC J5005) (394) | 2022.08.15 |
| 0bda:c811 RTL8821CU 데비안 인식 하기 (408) | 2022.05.21 |
| docker macvlan 네트워크를 호스트에서 접근하기 (403) | 2022.05.20 |
| Apache Guacamole docker 를 통해 설치하기 (413) | 2022.04.13 |


댓글