안녕하세요? 도정진입니다.
Cloudflare 에서 DDNS를 설정하기 위해서는 ddclient 나 직접 API 콜을 보내는 방법이 있는 것 같습니다.
제일 편리하게 사용할 수 있는 방법이 ddclient 를 사용하는 것 같습니다. 이 방법으로 바로 설정해보겠습니다.
1. ddclient 설치하기
https://github.com/ddclient/ddclient
3.9.1 버전을 소스로 받아 올려보겠습니다.
일단은 ddclient 는 perl 스크립트로 되어 있는것 같아 보여 컴파일이 필요 없는 것으로 보입니다.

| # 소스를 받습니다. 릴리즈 기준으로 받기 때문에 tar.gz 파일로 받습니다. root@debian:~# wget https://github.com/ddclient/ddclient/archive/refs/tags/v3.9.1.tar.gz # 압축을 풉니다. root@debian:~# tar xf v3.9.1.tar.gz root@debian:~# cd ddclient-3.9.1/ # 실행이 되는지 확인합니다. root@debian:~/ddclient-3.9.1# ./ddclient Can't locate Data/Validate/IP.pm in @INC (you may need to install the Data::Validate::IP module) (@INC contains: /etc/perl /usr/local/lib/x86_64-linux-gnu/perl/5.28.1 /usr/local/share/perl/5.28.1 /usr/lib/x86_64-linux-gnu/perl5/5.28 /usr/share/perl5 /usr/lib/x86_64-linux-gnu/perl/5.28 /usr/share/perl/5.28 /usr/local/lib/site_perl /usr/lib/x86_64-linux-gnu/perl-base) at ./ddclient line 27. BEGIN failed--compilation aborted at ./ddclient line 27. # 무언가 실행이 안되는 것 같습니다. 하기 패키지를 추가 설치합니다. root@debian:~/ddclient-3.9.1# apt install libdata-validate-ip-perl libio-socket-ssl-perl libjson-pp-perl libio-socket-inet6-perl # 다시 실행해봅니다. root@debian:~/ddclient-3.9.1# ./ddclient WARNING: file /etc/ddclient/ddclient.conf: Cannot open file '/etc/ddclient/ddclient.conf'. (No such file or directory) stat() on closed filehandle FD at ./ddclient line 1167. Use of uninitialized value $mode in bitwise and (&) at ./ddclient line 1168. readline() on closed filehandle FD at ./ddclient line 1180. WARNING: file /etc/ddclient/ddclient.conf: Cannot open file '/etc/ddclient/ddclient.conf'. (No such file or directory) stat() on closed filehandle FD at ./ddclient line 1167. Use of uninitialized value $mode in bitwise and (&) at ./ddclient line 1168. readline() on closed filehandle FD at ./ddclient line 1180. # 실행이 되는 것 같습니다. # 파일 배치를 하기 전에 배포판의 ddclient 를 설치를 한번 해줍니다. root@debian:~/ddclient-3.9.1# apt install ddclient root@debian:~/ddclient-3.9.1# cp ddclient /usr/sbin/ddclient root@debian:~/ddclient-3.9.1# cp sample-etc_ddclient.conf /etc/ddclient.conf |
2. Cloudflare DDNS 설정하기
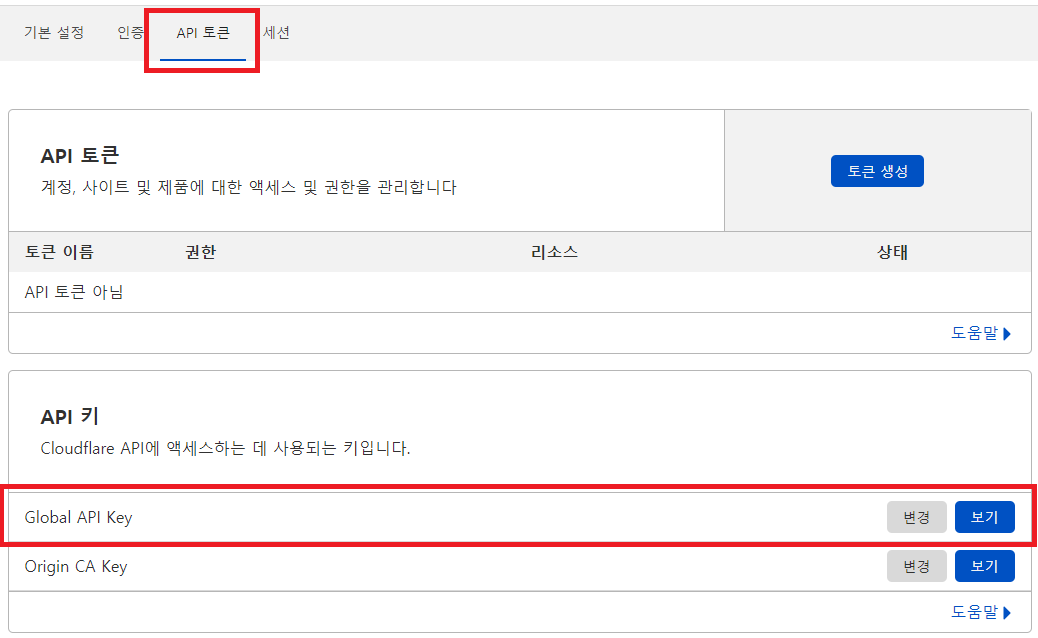
일단 API 키를 생성하거나 전체 API키를 알아내야합니다.
Cloudflare 사이트에 가서 내 프로필로 이동하여 API를 생성하거나 이미 있는 키를 사용합니다.


DNS만 사용을 하고 있음으로 상기 API 토큰을 생성하지 않고 글로벌 키를 통해 설정을 해보겠습니다.
| root@debian:~/ddclient-3.9.1# vi /etc/ddclient.conf # 프로토콜 설정 protocol=cloudflare # 존 설정 (사이트 도메인) zone=djjproject.com # Cloudflare 아이디 입력 login=djj9405@naver.com # Cloudflare API 키 입력 password= # 설정 도메인 입력 (콤마로 구분) # 저는 와일드 카드 까지 등록을 해보았습니다. djjproject.com,*.djjproject.com |
설정을 완료 하였으면 디버깅 모드로 정상적으로 등록이 되는지 체크합니다.
| root@debian:/etc# ddclient -daemon=0 -debug -verbose -noquiet WARNING: file /etc/ddclient/ddclient.conf: Cannot open file '/etc/ddclient/ddclient.conf'. (No such file or directory) |
위치 설정을 잘못하여 ddclient.conf 파일을 다시 옮기고 시도해 보겠습니다.
운영체제 배포판에 들어있는 ddclient 는 본래 /etc/ddclient.conf 를 사용했어서, 최신버전도 동일할 것이라고 생각했으나 그렇지가 않네요.
폴더를 하나 생성하여 설정파일을 이동시켜 줍니다.
| root@debian:/etc# mkdir ddclient root@debian:/etc# mv ddclient.conf ddclient/ |
음 실행해보면 하기와 같이 에러가 발생합니다.
| WARNING: found neither ipv4 nor ipv6 address DEBUG: get_ip: using ip, ip reports <undefined> WARNING: unable to determine IP address WARNING: found neither ipv4 nor ipv6 address DEBUG: get_ip: using ip, ip reports <undefined> WARNING: unable to determine IP address |
직접적으로 인터페이스를 지정하여 설정을 하겠습니다.
일단 인터페이스 이름을 파악합니다.
| root@debian:/etc# ifconfig vmbr0: flags=4163<UP,BROADCAST,RUNNING,MULTICAST> mtu 1500 inet 192.168.0.17 netmask 255.255.255.0 broadcast 192.168.0.255 inet6 fe80::1e69:7aff:fe09:6d01 prefixlen 64 scopeid 0x20<link> ether 1c:69:7a:09:6d:01 txqueuelen 1000 (Ethernet) RX packets 8575539698 bytes 8427867338913 (7.6 TiB) RX errors 0 dropped 0 overruns 0 frame 0 TX packets 9156476934 bytes 9774409368703 (8.8 TiB) TX errors 0 dropped 0 overruns 0 carrier 0 collisions 0 root@debian:/etc# vi /etc/ddclient/ddclient.conf protocol=cloudflare use=if, if=vmbr0 zone=djjproject.com login=djj9405@naver.com password= djjproject.com,*.djjproject.com |
다시 시도해 봅니다.
| INFO: setting IP address to 192.168.0.17 for djjproject.com SUCCESS: djjproject.com -- Updated Successfully to 192.168.0.17 |
다시 시도하니 아이피를 로컬 아이피를 잡아버리는 문제가 있네요. 음..

조금 더 수정해 봅니다.
공유기 밑에 있기 때문에 아이피를 알 수가 없습니다. use 항목을 web으로 수정하여 다시 시도해 보겠습니다.
| protocol=cloudflare use=web, web=checkip.dyndns.org zone=djjproject.com login=djj9405@naver.com password= djjproject.com,*.djjproject.com |
다시 시도해 봅니다.
| WARNING: skipping update of *.djjproject.com from 192.168.0.17 to 14.36.92.173. WARNING: last updated Fri Oct 1 00:15:31 2021. WARNING: Wait at least 5 minutes between update attempts. WARNING: skipping update of djjproject.com from <nothing> to 14.36.92.173. WARNING: last updated <never> but last attempt on Fri Oct 1 00:15:31 2021 failed. WARNING: Wait at least 5 minutes between update attempts. |
오 되는것 같습니다. 5분이 지나지 않아서 업데이트가 안되는 것으로 보이네요.
5분 뒤에 다시 시도해 보면 하기와 같이 정상적으로 업데이트가 됩니다.
| SUCCESS: djjproject.com -- Updated Successfully to 14.36.92.173 SUCCESS: *.djjproject.com -- Updated Successfully to 14.36.92.173 |

완벽합니다.
3. 5분 마다 갱신하기
물론 crontab 을 사용할 수 있지만, 체크해보면 데몬으로 설정할 수 있는 것이 있습니다.
| root@debian:/etc# vi default/ddclient run_daemon="true" root@debian:/etc# systemctl enable ddclient ddclient.service is not a native service, redirecting to systemd-sysv-install. Executing: /lib/systemd/systemd-sysv-install enable ddclient root@debian:/etc# systemctl restart ddclient root@debian:/etc# systemctl status ddclient ● ddclient.service - LSB: Update dynamic domain name service entries Loaded: loaded (/etc/init.d/ddclient; generated) Active: active (running) since Fri 2021-10-01 00:24:22 KST; 3s ago Docs: man:systemd-sysv-generator(8) Process: 23810 ExecStart=/etc/init.d/ddclient start (code=exited, status=0/SUCCESS) Tasks: 1 (limit: 4915) Memory: 12.1M CGroup: /system.slice/ddclient.service └─23817 ddclient - sleeping for 300 seconds Oct 01 00:24:22 debian systemd[1]: Starting LSB: Update dynamic domain name service entries... Oct 01 00:24:22 debian systemd[1]: Started LSB: Update dynamic domain name service entries. |
간단히 여기서 마치겠습니다.
감사합니다.
'서버 > 리눅스 서버' 카테고리의 다른 글
| Cloudflare 네임서버 Let's Encrypt DNS 갱신하기 (3/3) (415) | 2021.11.18 |
|---|---|
| MiniDLNA 1.3.0 컴파일 하기 (DSD 지원) (407) | 2021.11.04 |
| Cloudflare 네임서버 사용하기 (1/3) (0) | 2021.09.30 |
| X96 Air P4 / Docker 소켓 / HomeAssistant, Zigbee2Mqtt 설치 / 통합 미디어센터 + IOT 플랫폼 (0) | 2021.08.11 |
| 파티션 작업, parted 간단 적응기 (X96Air P4 / CoreELEC) (0) | 2021.08.02 |


댓글